This page is where I’m going to briefly collect all my Coco-2 thoughts. Starting with my videos on the subject,
Some history
The Coco-2 was the first computer I ever owned. Not necessarily the first one I ever used — that was either the IBM PC 5150, or the Convergent, or probably some 8-bit Atari in a department store. But the Coco-2 was the first one that earned a permanent place in my room. I remember bits and pieces of it. I had a speech synthesizer (took me a long, long time to figure out it was a RealTalker), I had a light pen, I had the single full-height floppy drive. I played Sands of Egypt and failed somewhere mid-way through. So I was excited to take on some Coco projects.
Buying a Coco
So you want to buy a Coco? Well you’re in luck, because they show up constantly on eBay. You have several versions to choose from, Coco-1, Coco-2, Coco-3, and even the MC-10 (which isn’t really a Coco). My first Coco was a 16KB extended basic Coco-2, so that’s what I set about buying. I had been watching eBay for years, and finally saw an auction for a NOS (new old stock) 16KB extended basic model, and the price wasn’t outrageous like the NOS ones often are, so I snatched it up. Watching the first video at the top of the page, you can see me unbox it.
Upgrading the memory
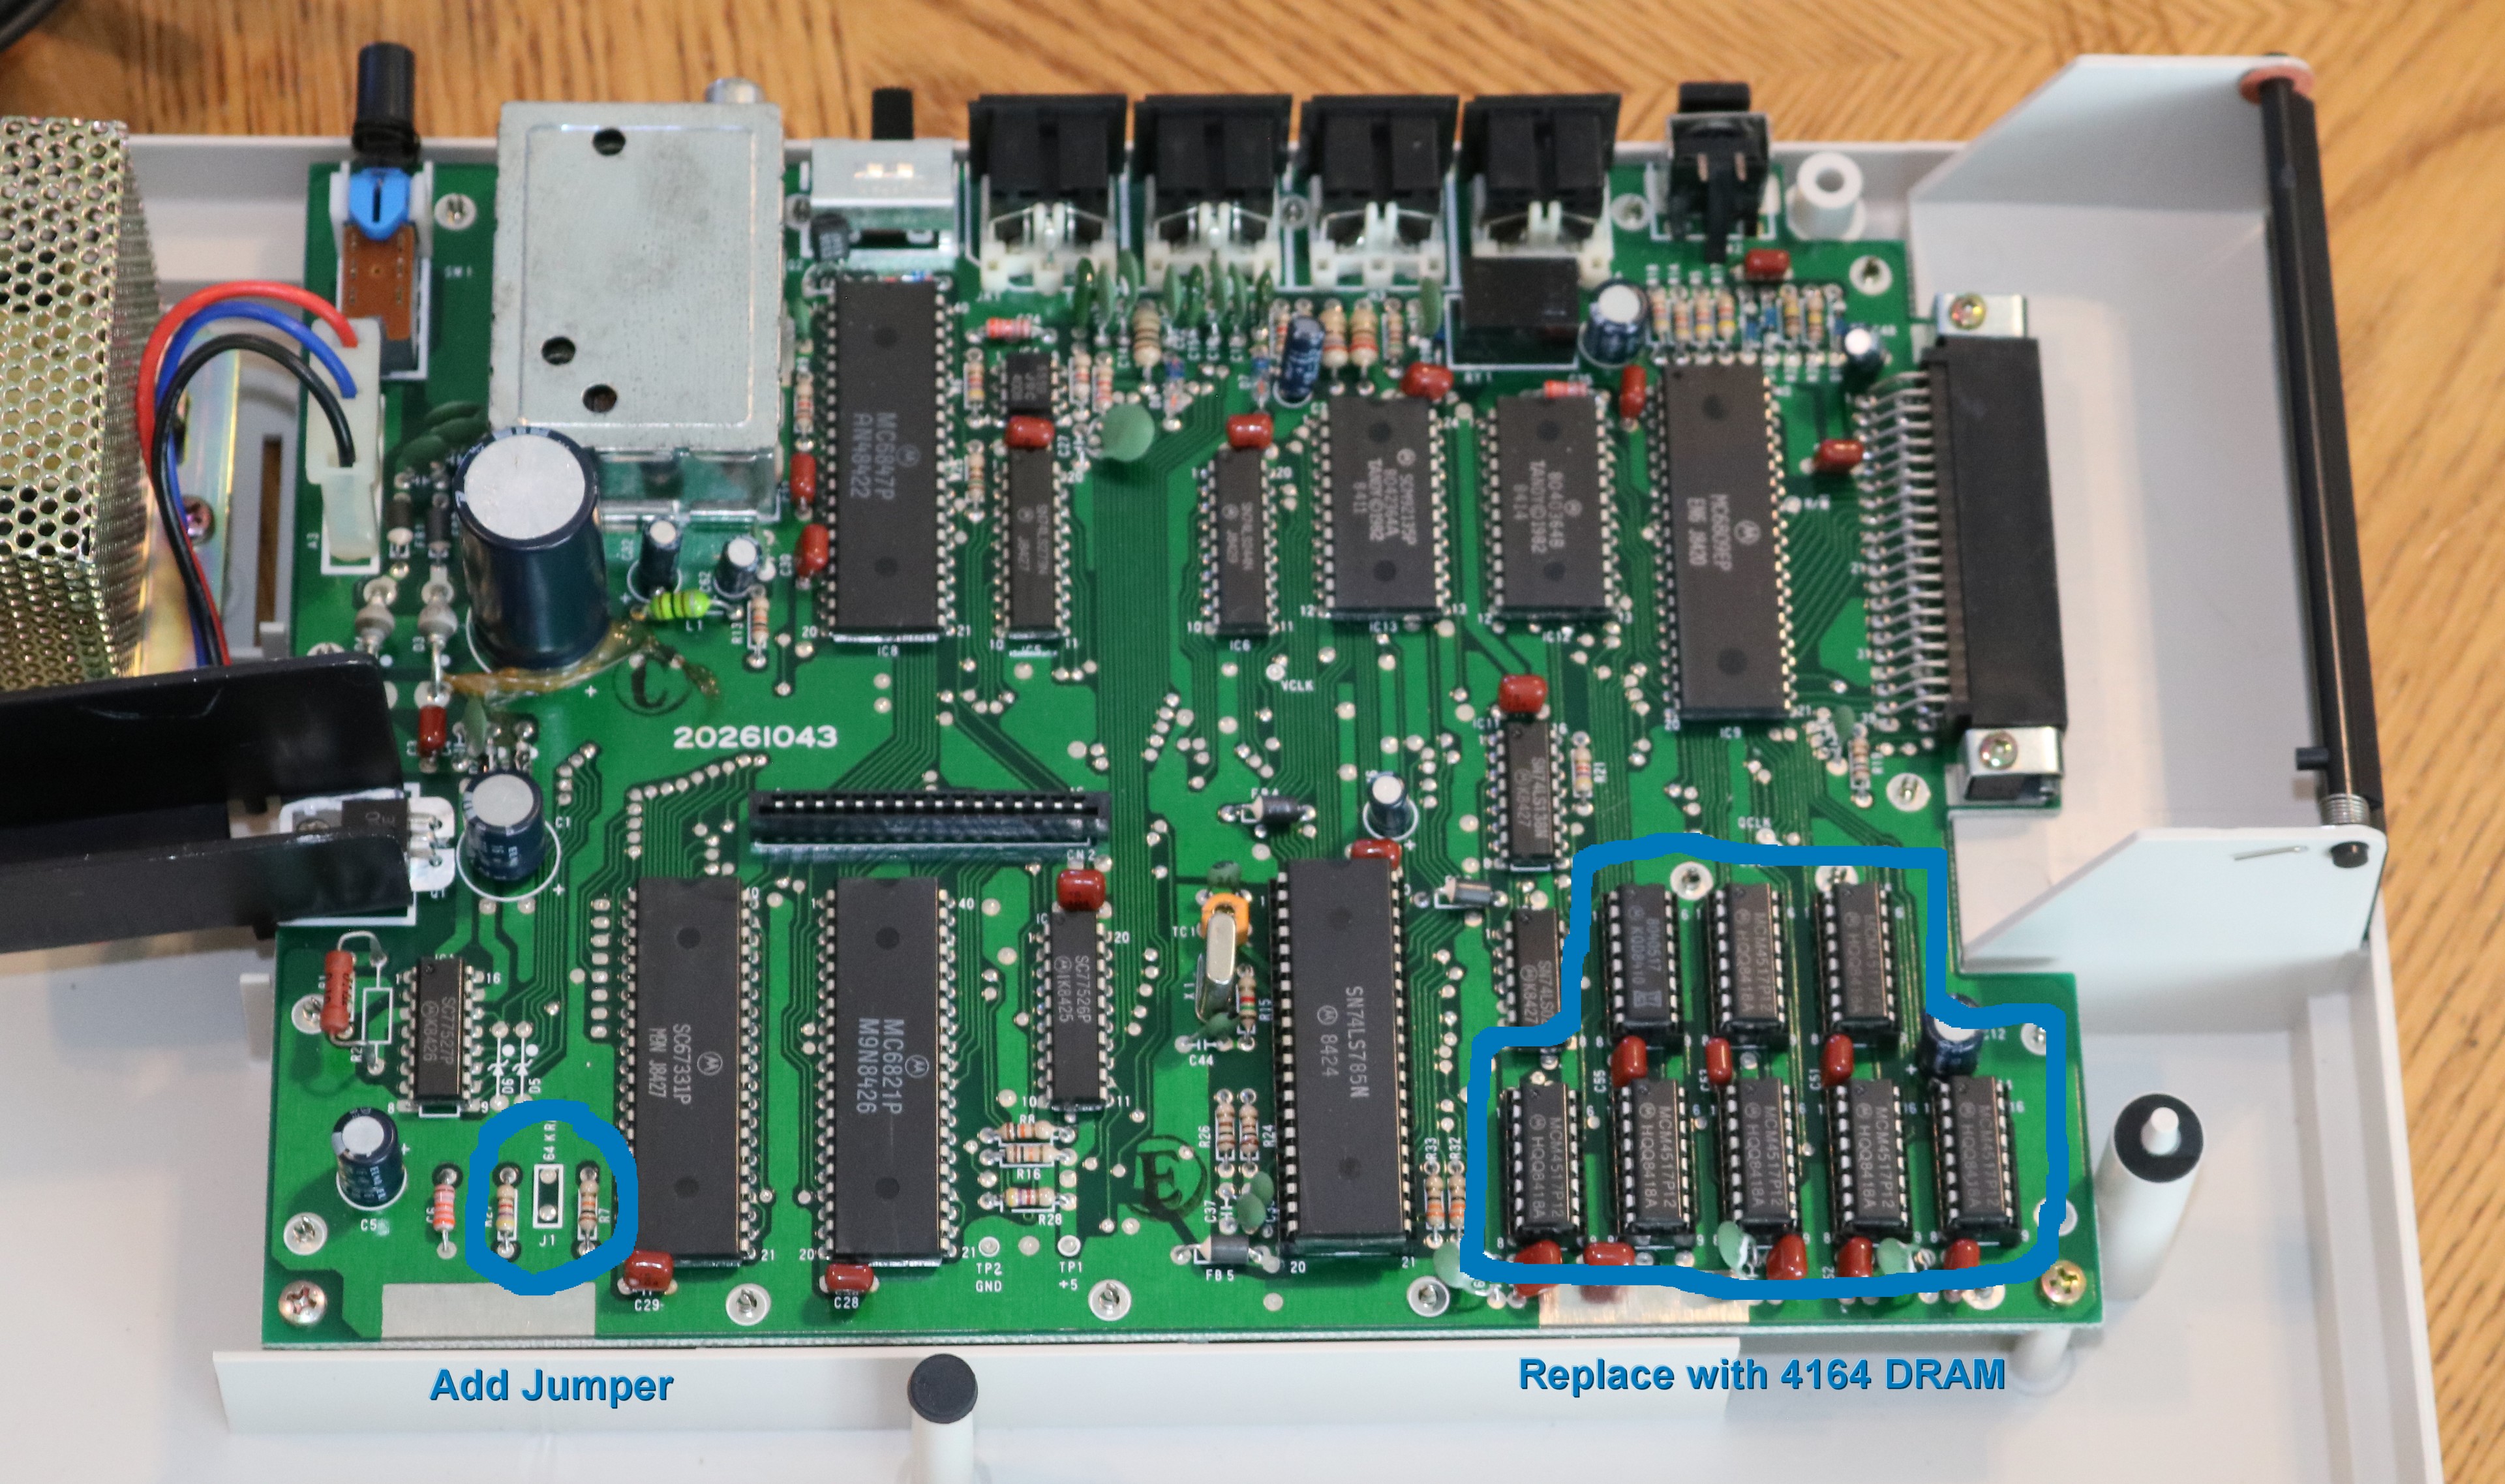
I remember back in the day upgrading the RAM on my Coco-2. I’m not sure if it was a 64KB or a 256KB upgrade, but I do recall plugging in some kind of piggyback ICs, and dealing with bank switching, so perhaps I had gone all the way to 256KB. Anyhow, my first modification to the NOS 16KB Coco was to boost its RAM from 16KB to 64KB. How you do this depends on which version of the Coco you have. In my case, it was simple enough to replace 8 DRAM chips with 4164s, and add a jumper in the appropriate place.
Installing a CocoVGA Board
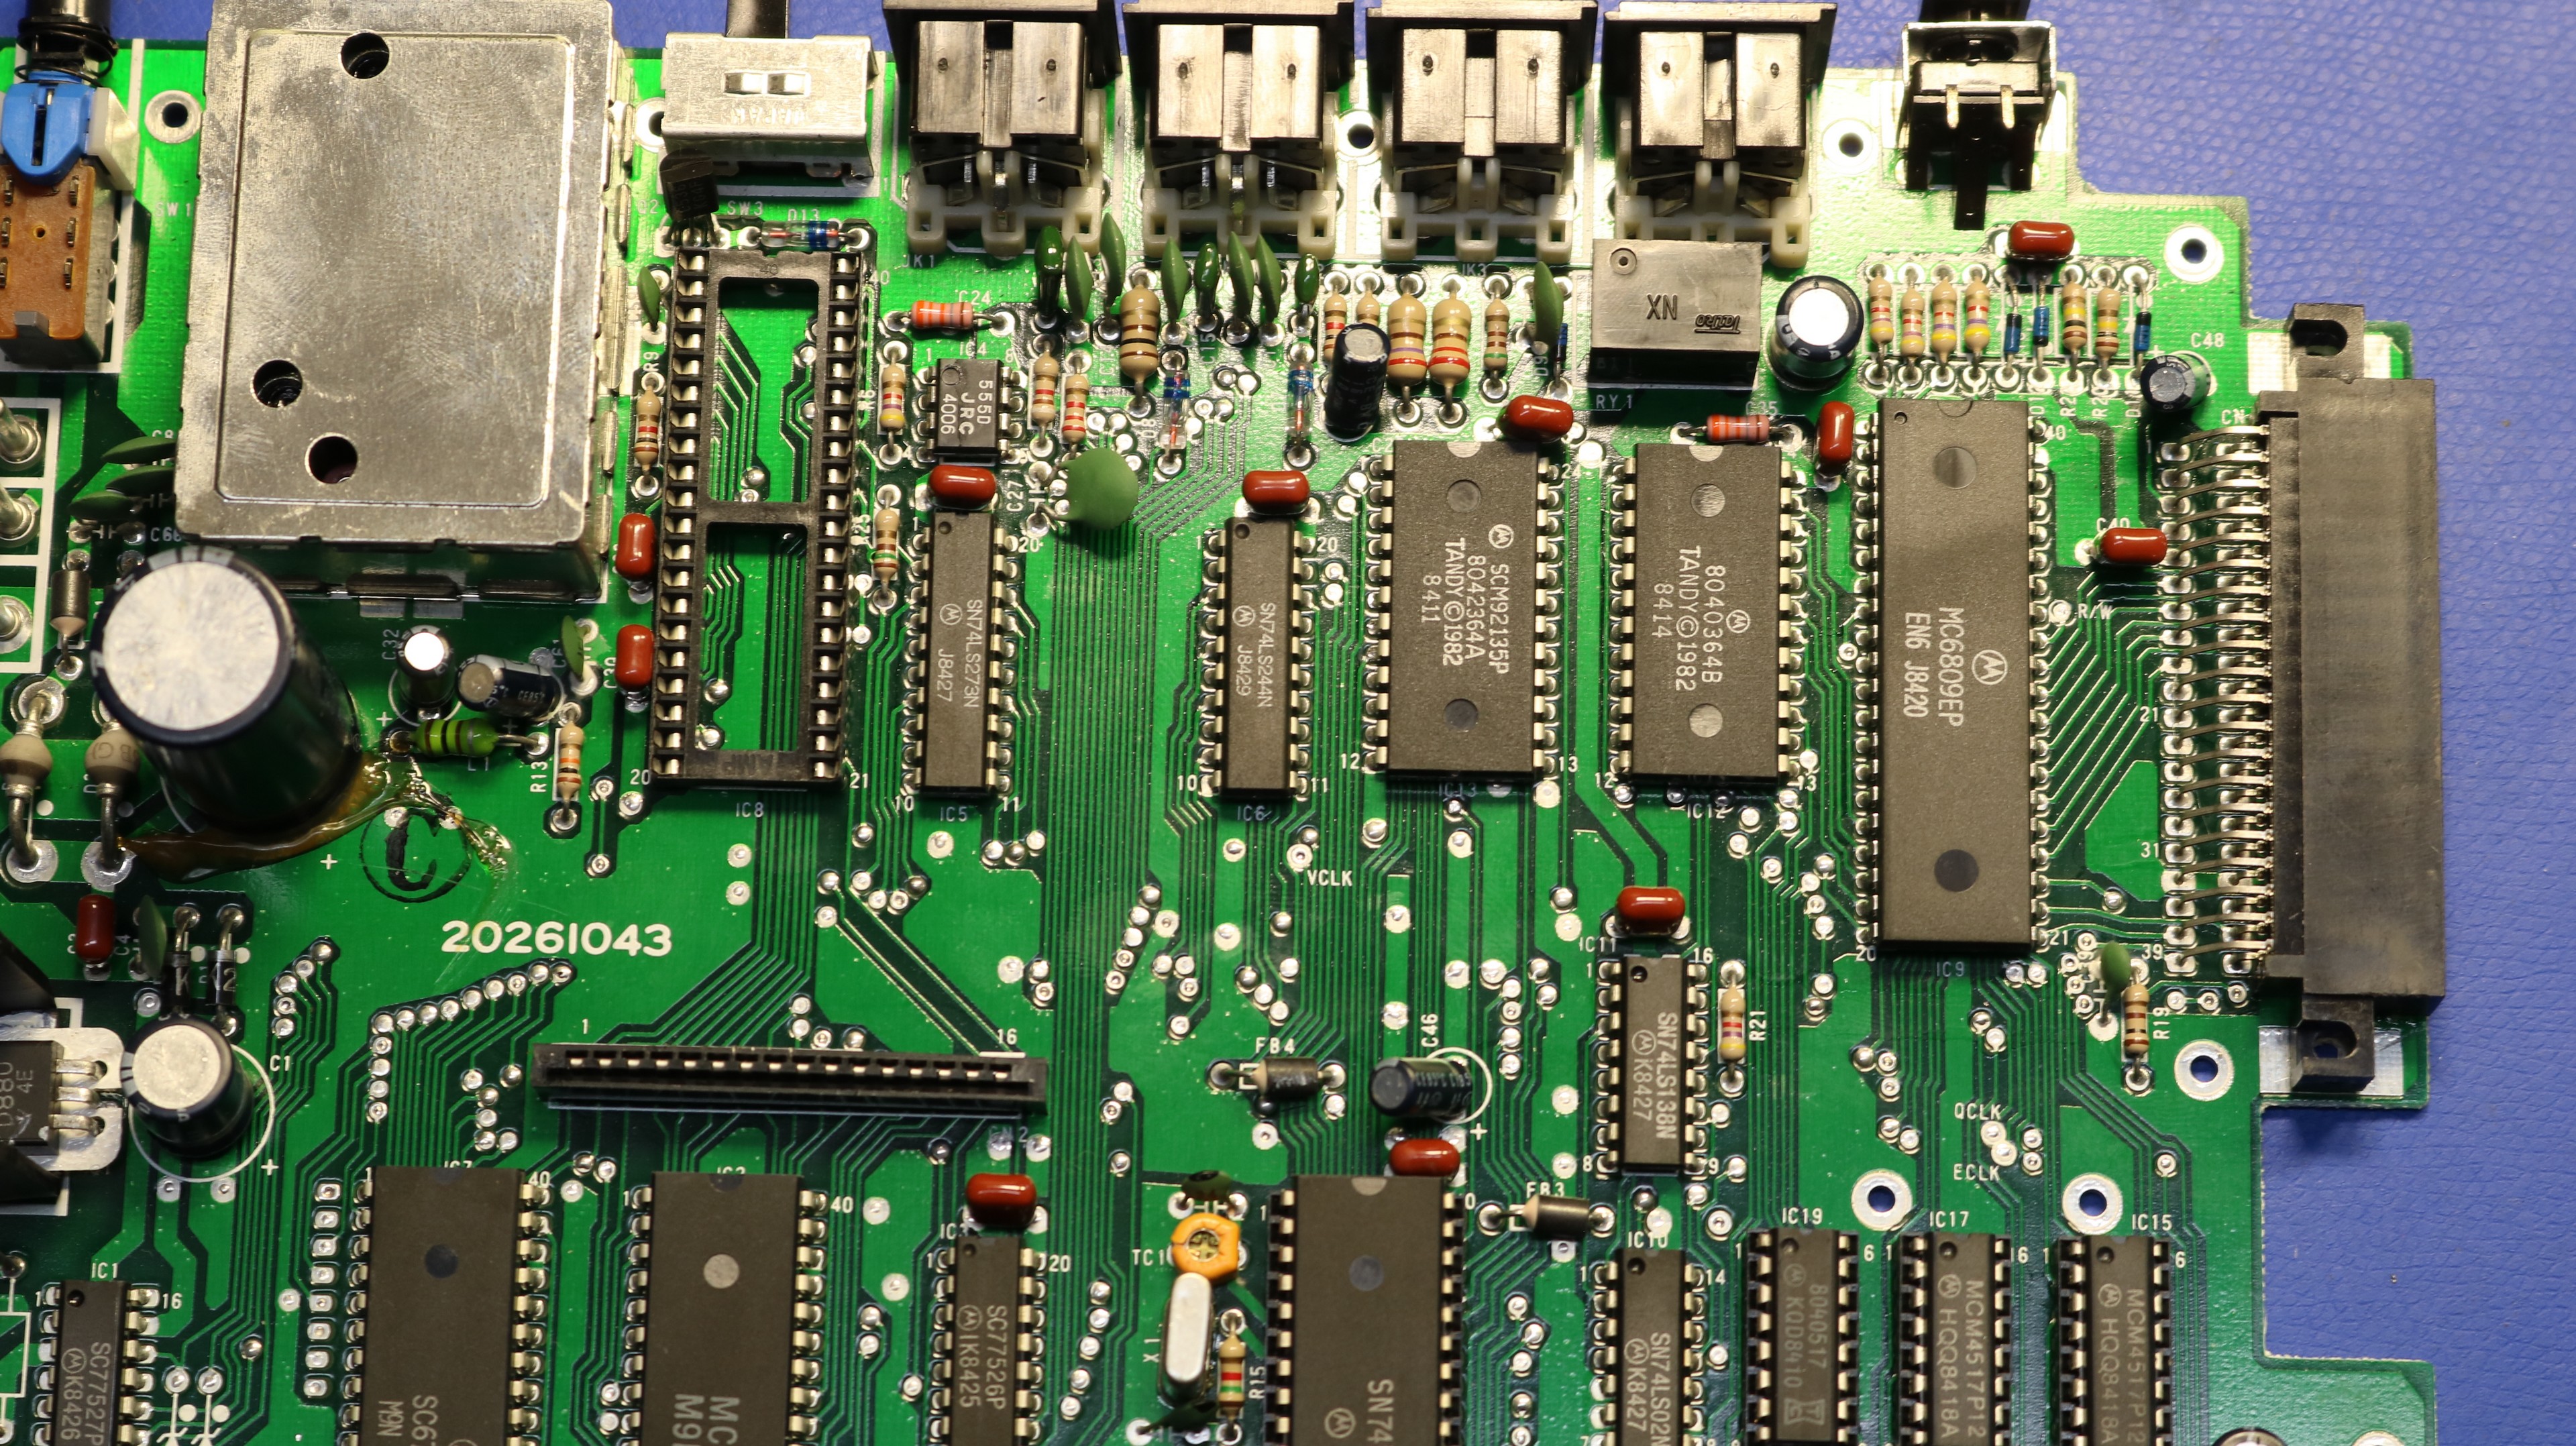
Next I decided I was going to add a CocoVGA board. While I had the motherboard out to do the RAM upgrade, I pulled the 6847 and installed a socket in its place. Having a socketed 6847 is a necessary prerequisite for the CocoVGA board.
Unfortunately, the wait list for the CocoVGA turned out to be kinda long, so this particular step is on-hold for now. I will update the blog when I my slot on the waitlist comes up.
Installing a composite mod
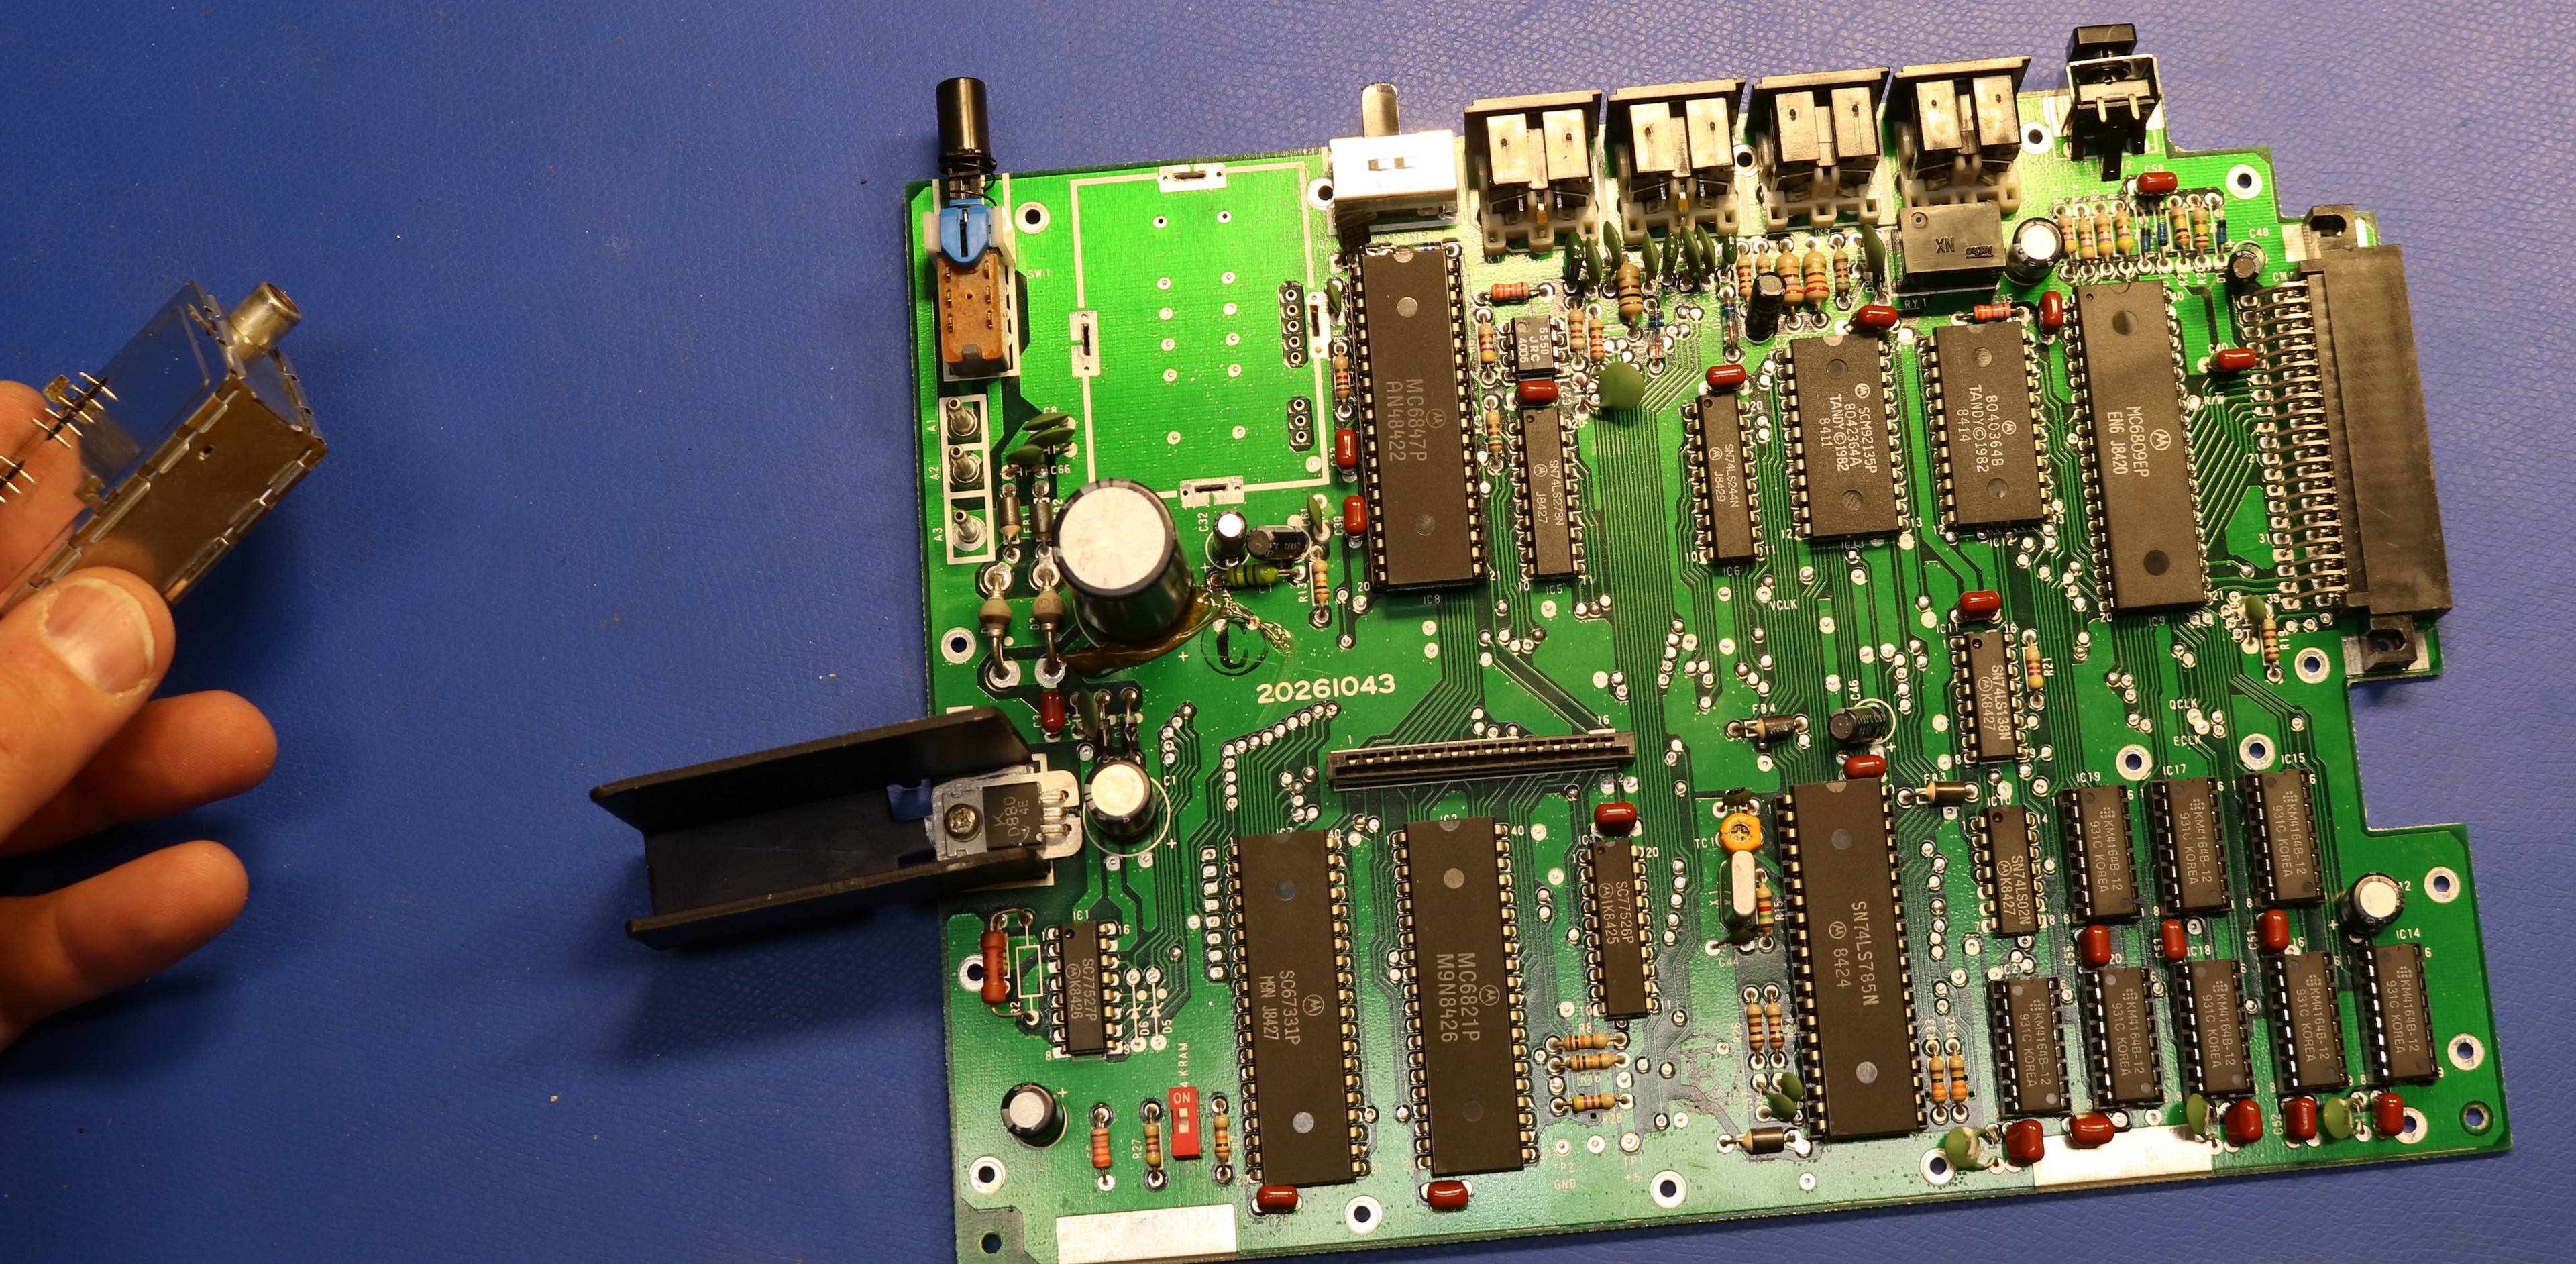
Given that I couldn’t get my hands on the CocoVGA board, I decided to go for the next-best thing, a high-quality composite modification. Ed Snider sells really nice composite boards on his website. Ed came up with this board when he came across a Coco2 that had a factory, yes a *factory*, composite output. These were apparently Cocos manufactured for educational purposes back in the day. Rather than using a TV, the educators used composite monitors. Installing Ed’s board is a little bit of desoldering work to get the RF modulator out.
Next, the composite board is installed in it’s place, together with a few wires to supply power:
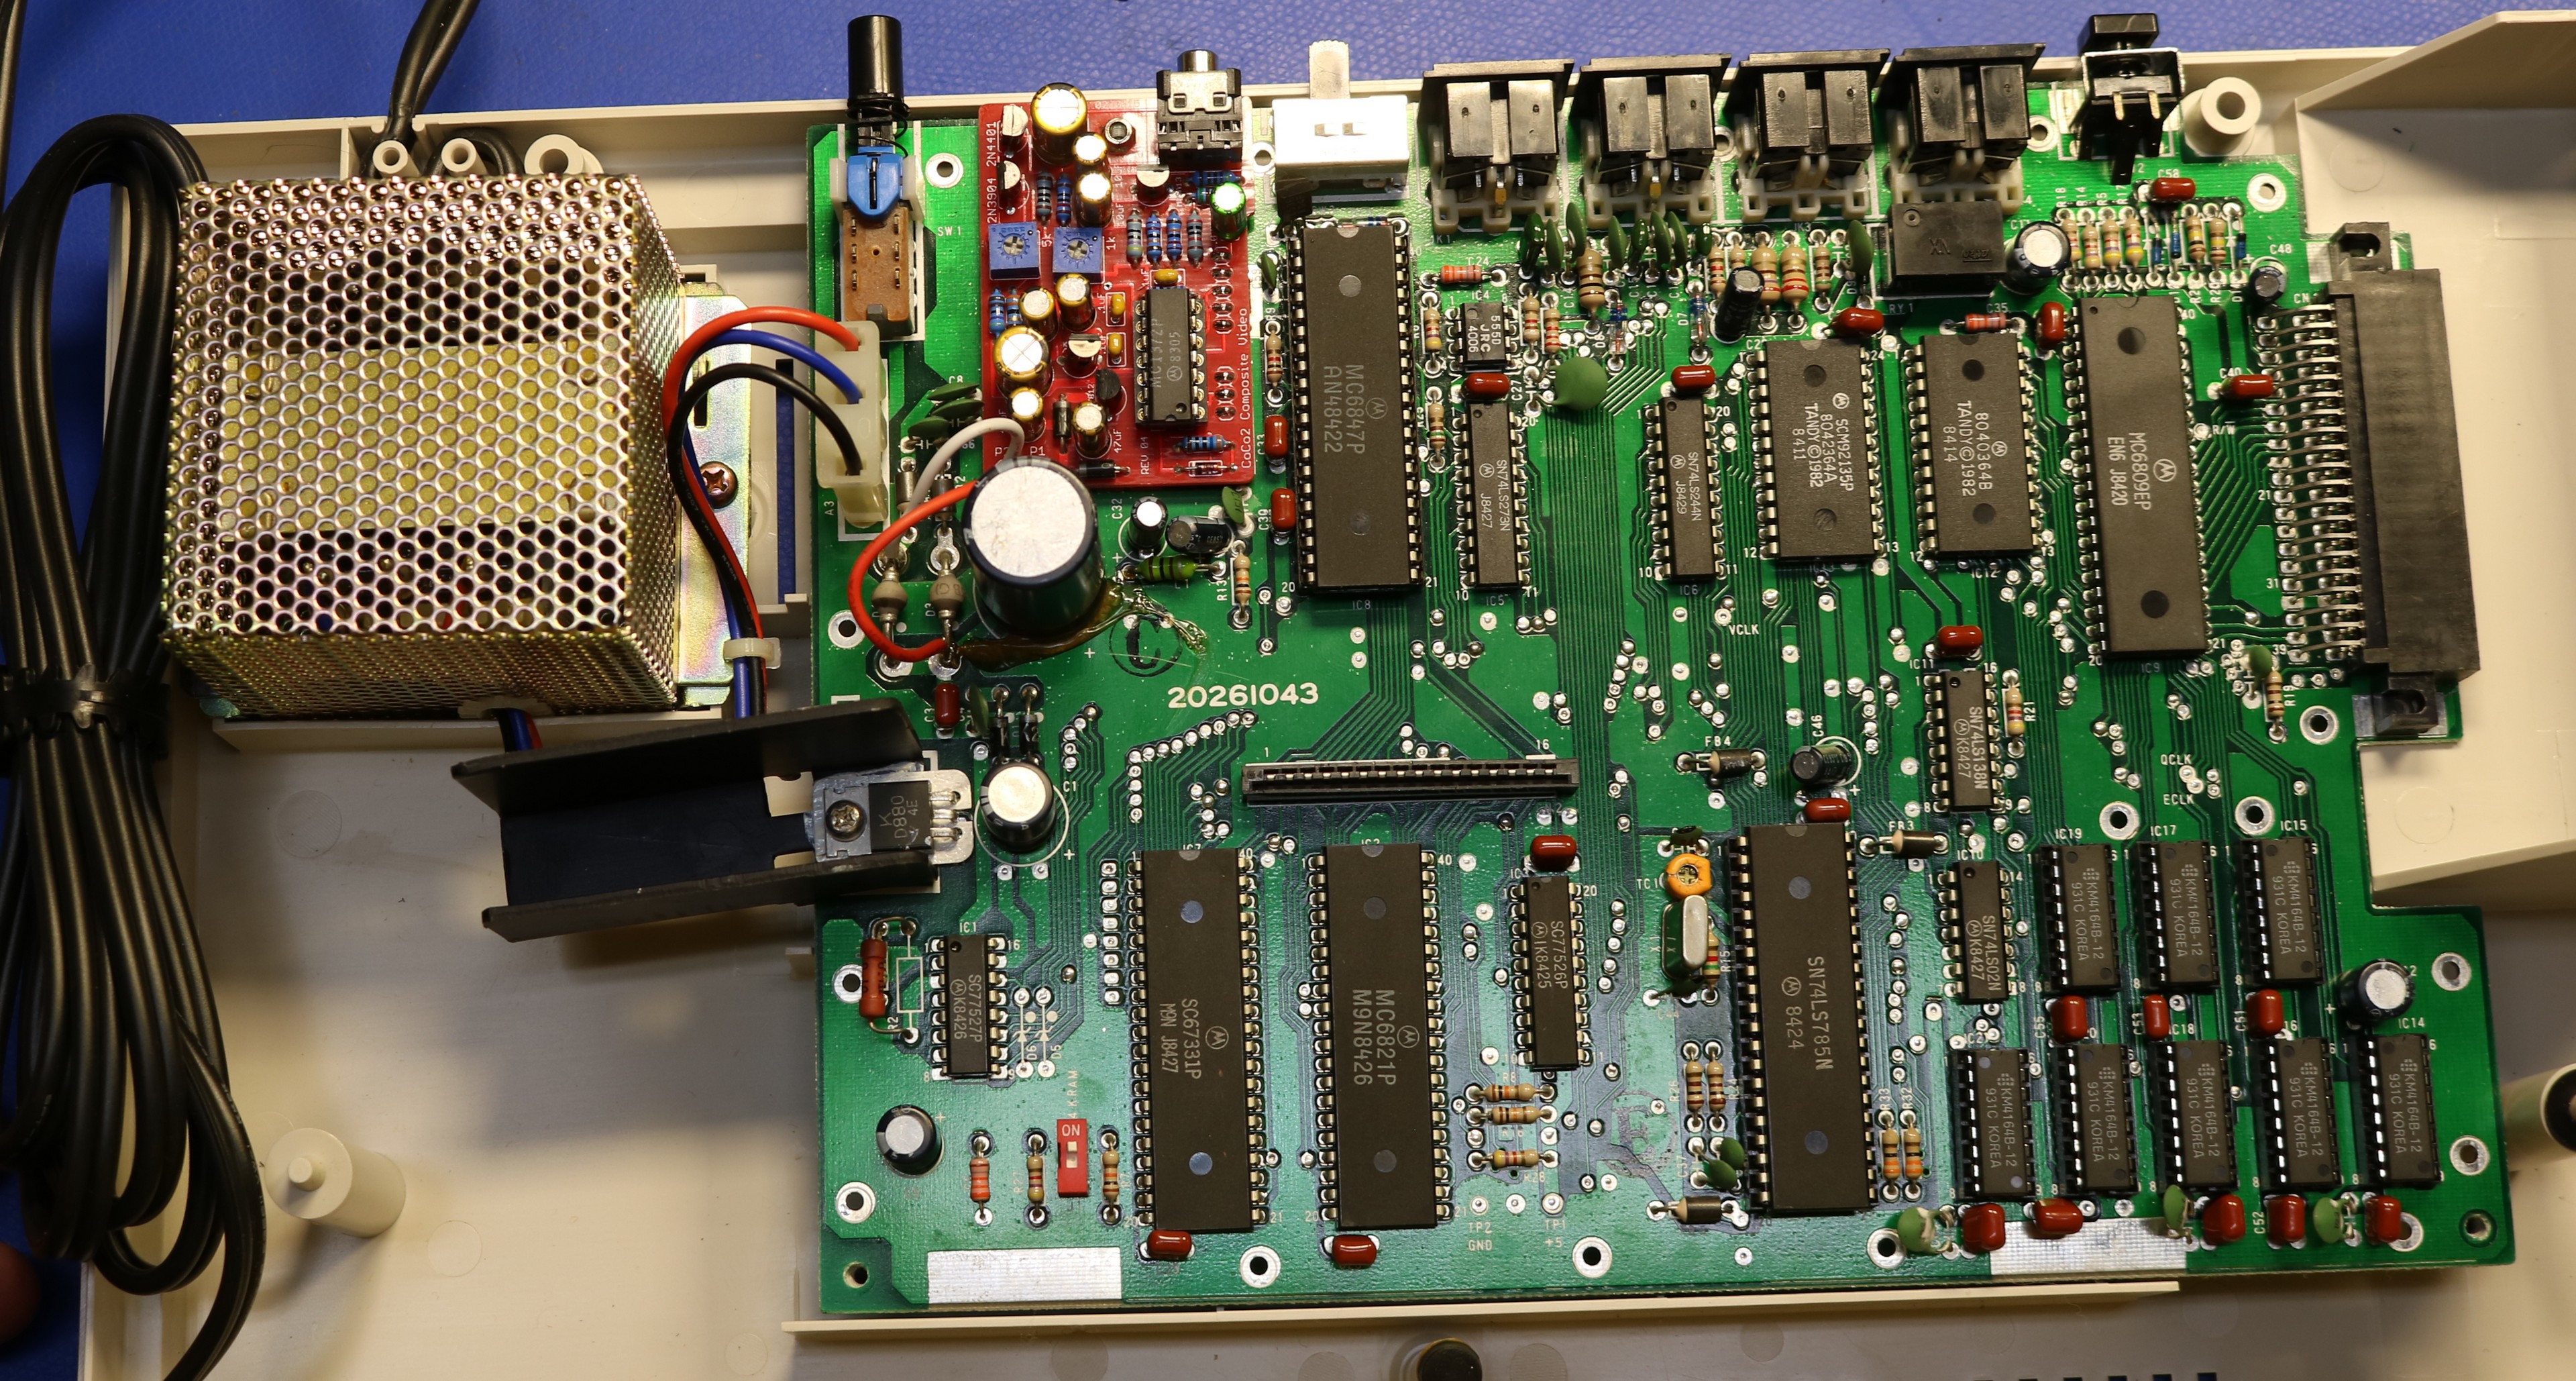
The video output was much improved. No more nasty ghosting. No more weird wavy lines. The Channel-3/Channel-4 switch is now a color/mono switch, and the mono output is really incredible. It is a color computer though, so most of the time you ought to operate it in … color.
Building a Multi-Pak Interface
One of the things I never owned back in the day was the MPI. The MPI allows you to select between four cartridges. You can either do so manually using a switch, or you can do so under software control. For devices that are merely peripherals, without a ROM, you can often operate them simultaneously together with a cartridge that does include a ROM, like the disk controller. This is really nice for using a speech synthesizer and a disk at the same time.
MPIs can be pricey, so I found some pcboard artwork from The Little Engineers, I built it, and I designed a 3D printed case around it.
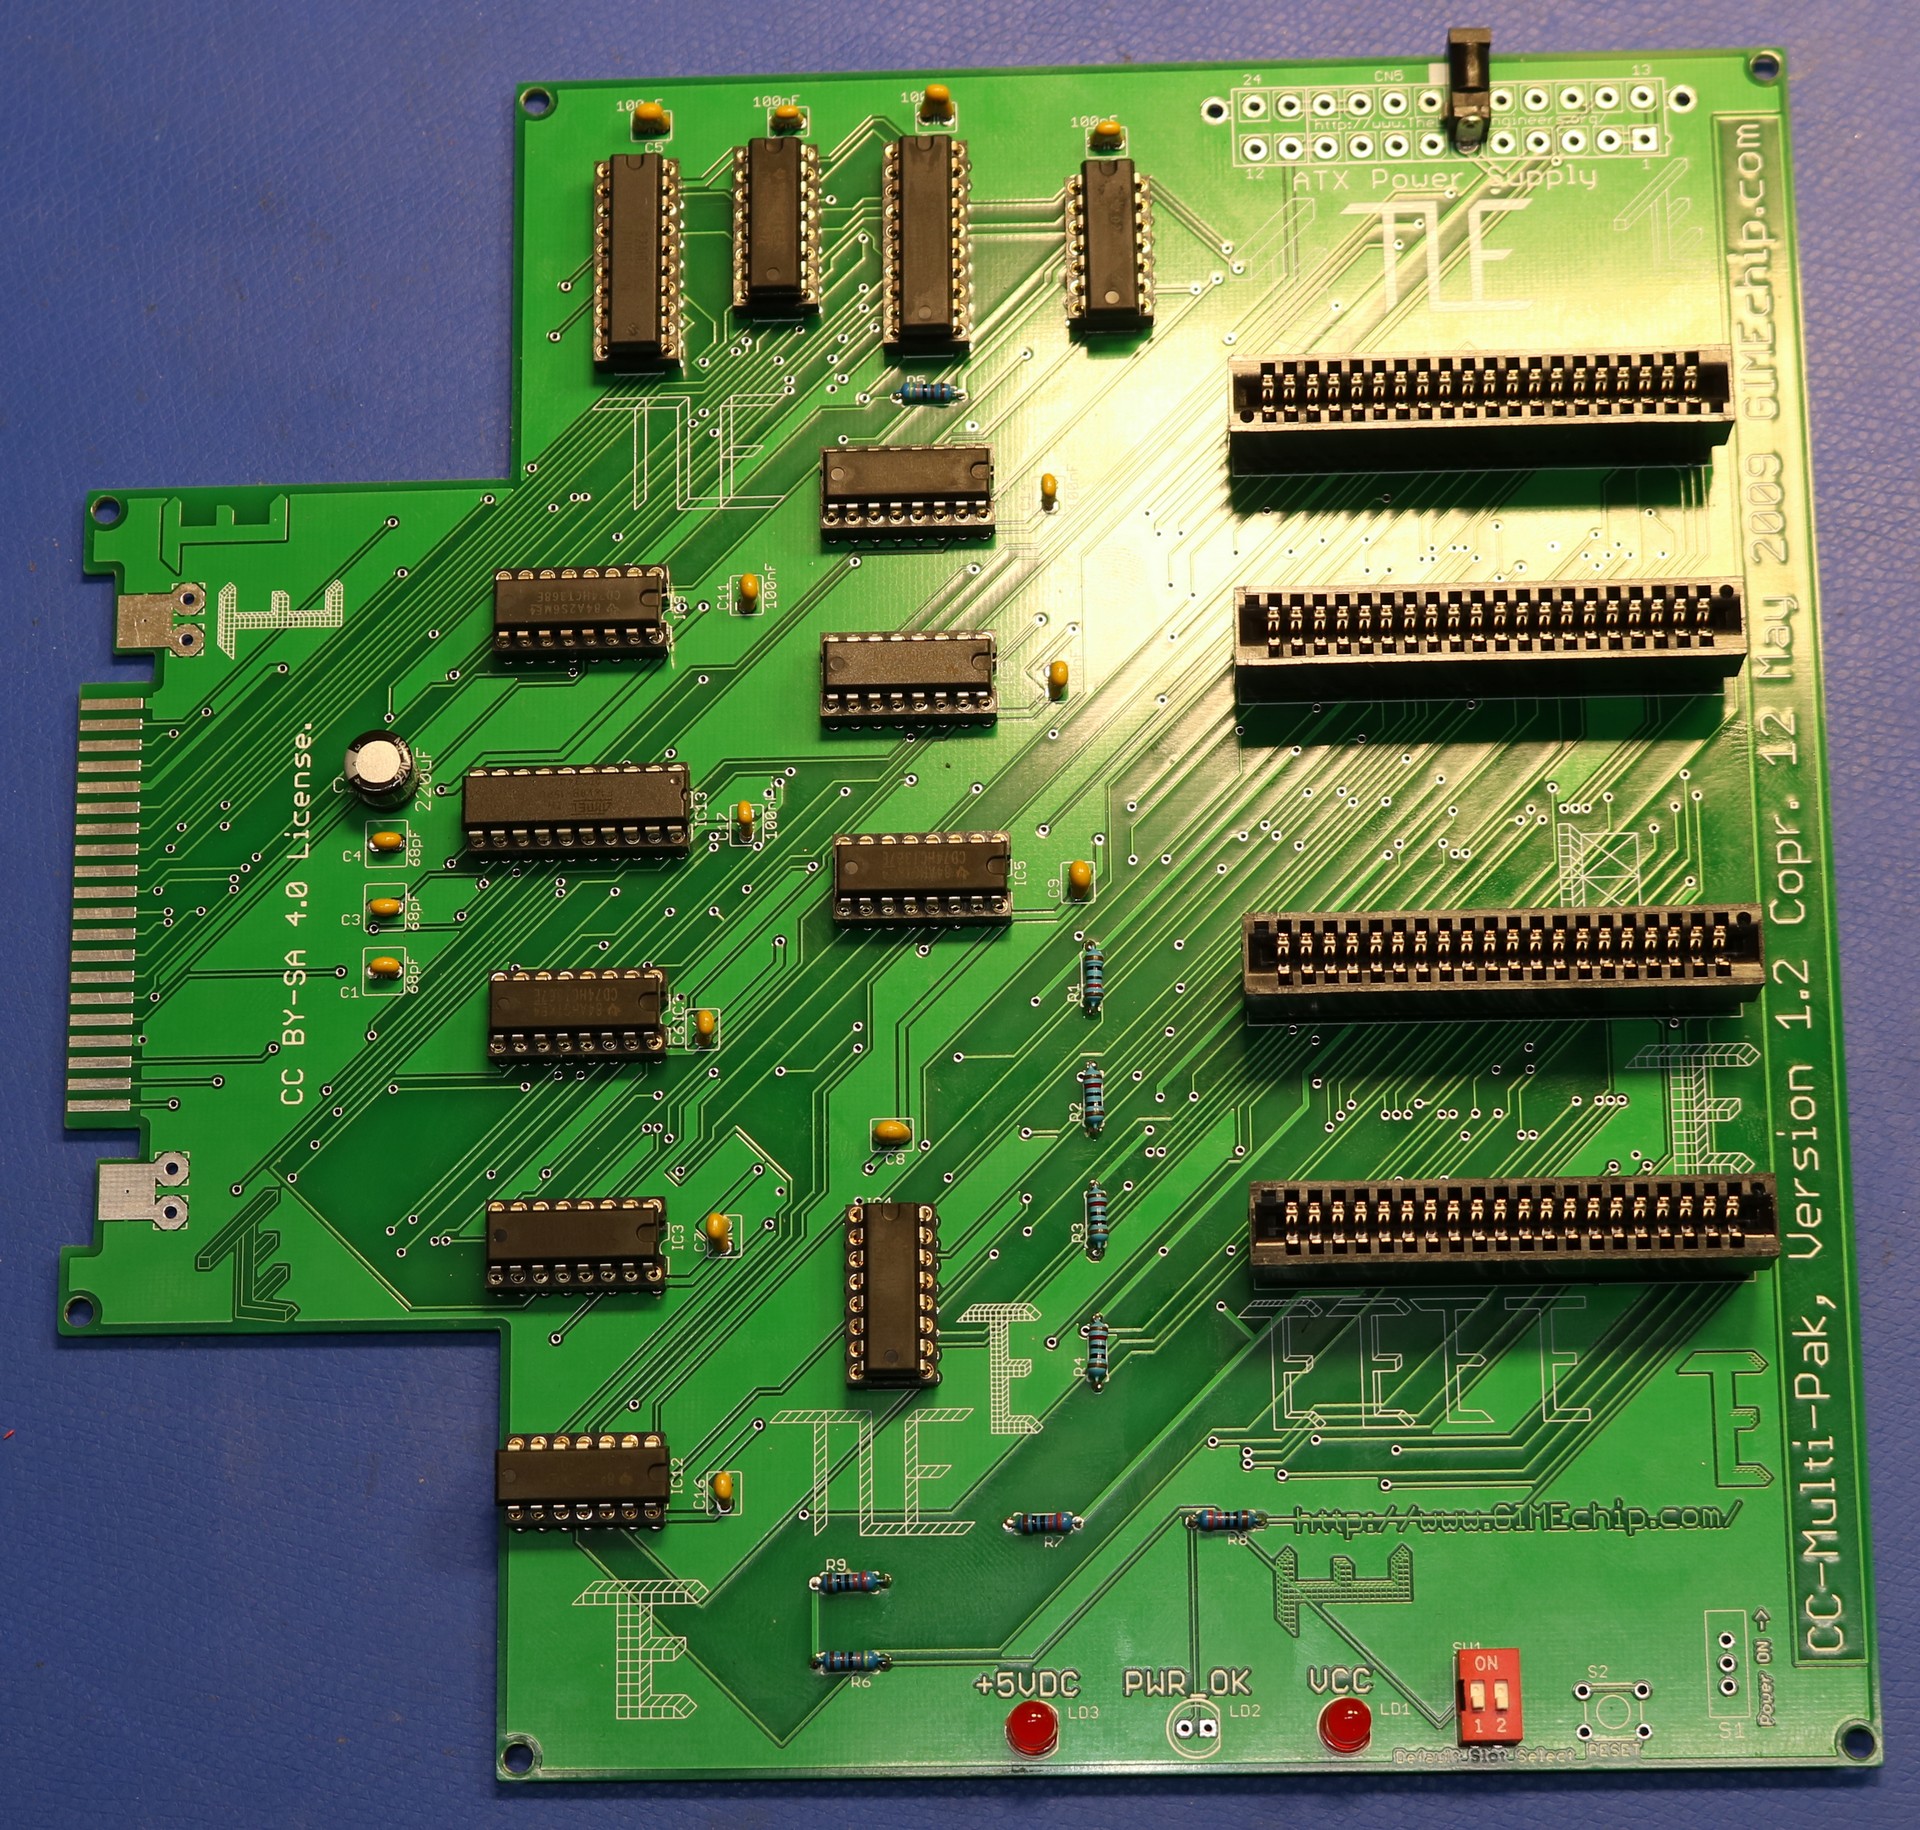
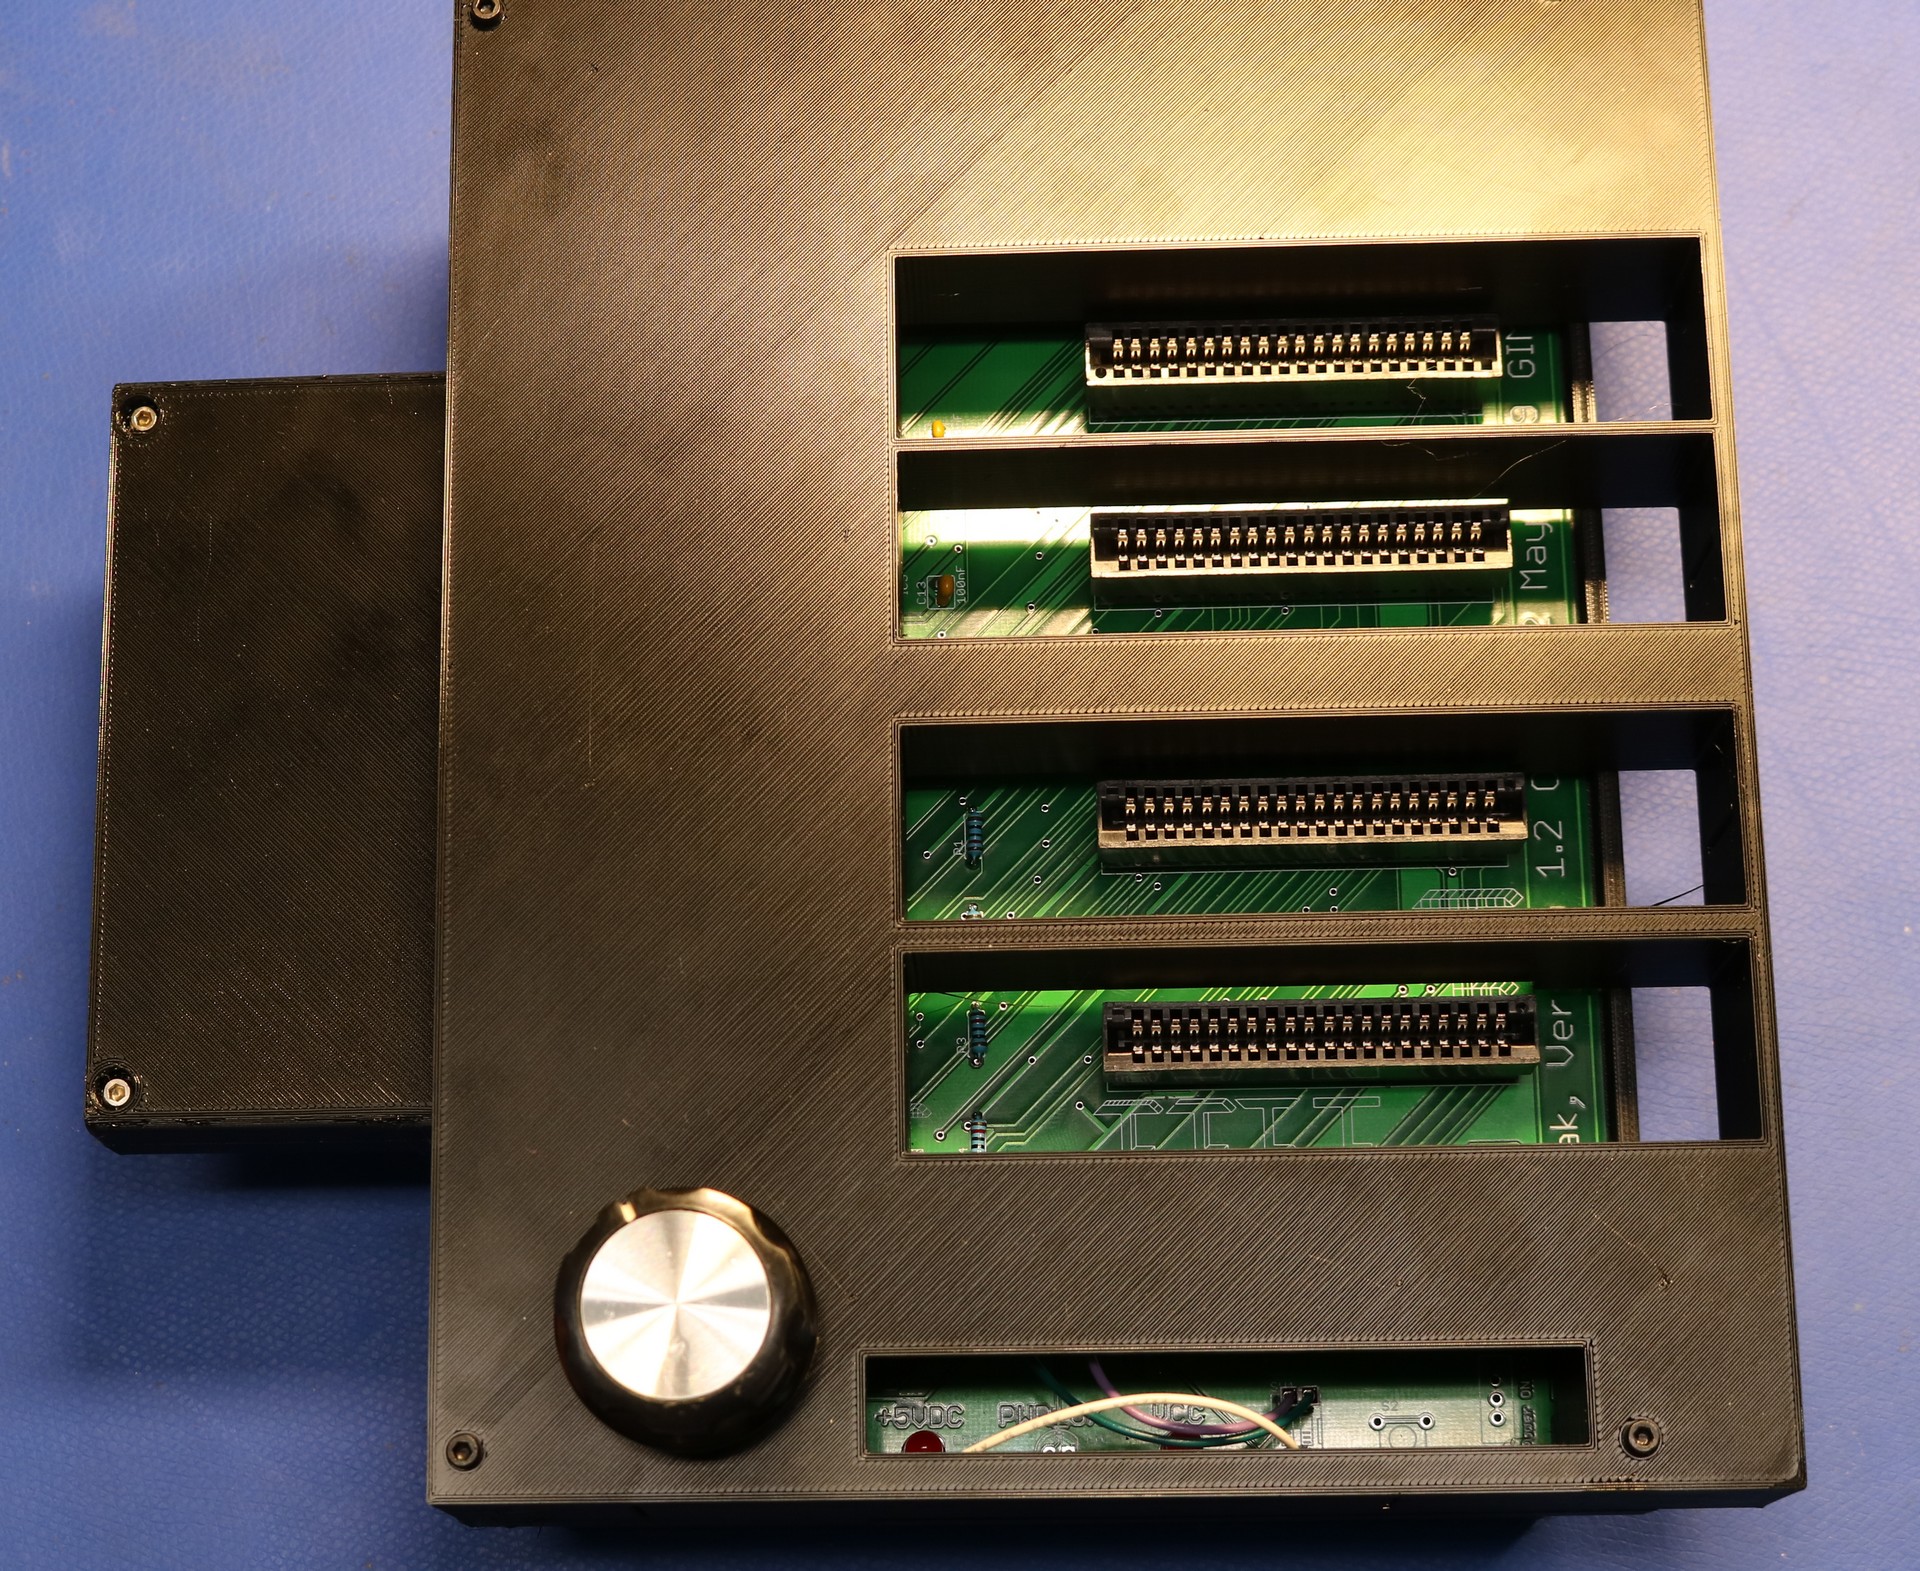
The board worked as expected. I was able to switch between ROMs, and I was able to simultaneously use the disk with some other cartridges, such as the speech/sound cartridge. I installed a big rotary knob instead of the little dip switches.
You’ll notice there’s a few weird things about the board, for example the slots are not equally spaced. They’re also number 4-to-1, rather than 1-to-4. I reworked the board a little and have a custom board on order to change it to my preferences.
The Speech/Sound Cartridge
I knew I had a speech synthesizer back in the day, and I wanted to get one again, so when a good deal on a Speech/Sound Program pak came up on eBay, I went ahead and ordered it. It was such a “good deal” because, as it turned out, the SP0256A-AL2 speech synthesizer IC was bad. It took me a while to diagnose that, and fortunately I had a spare SP0256A-AL2 on hand.
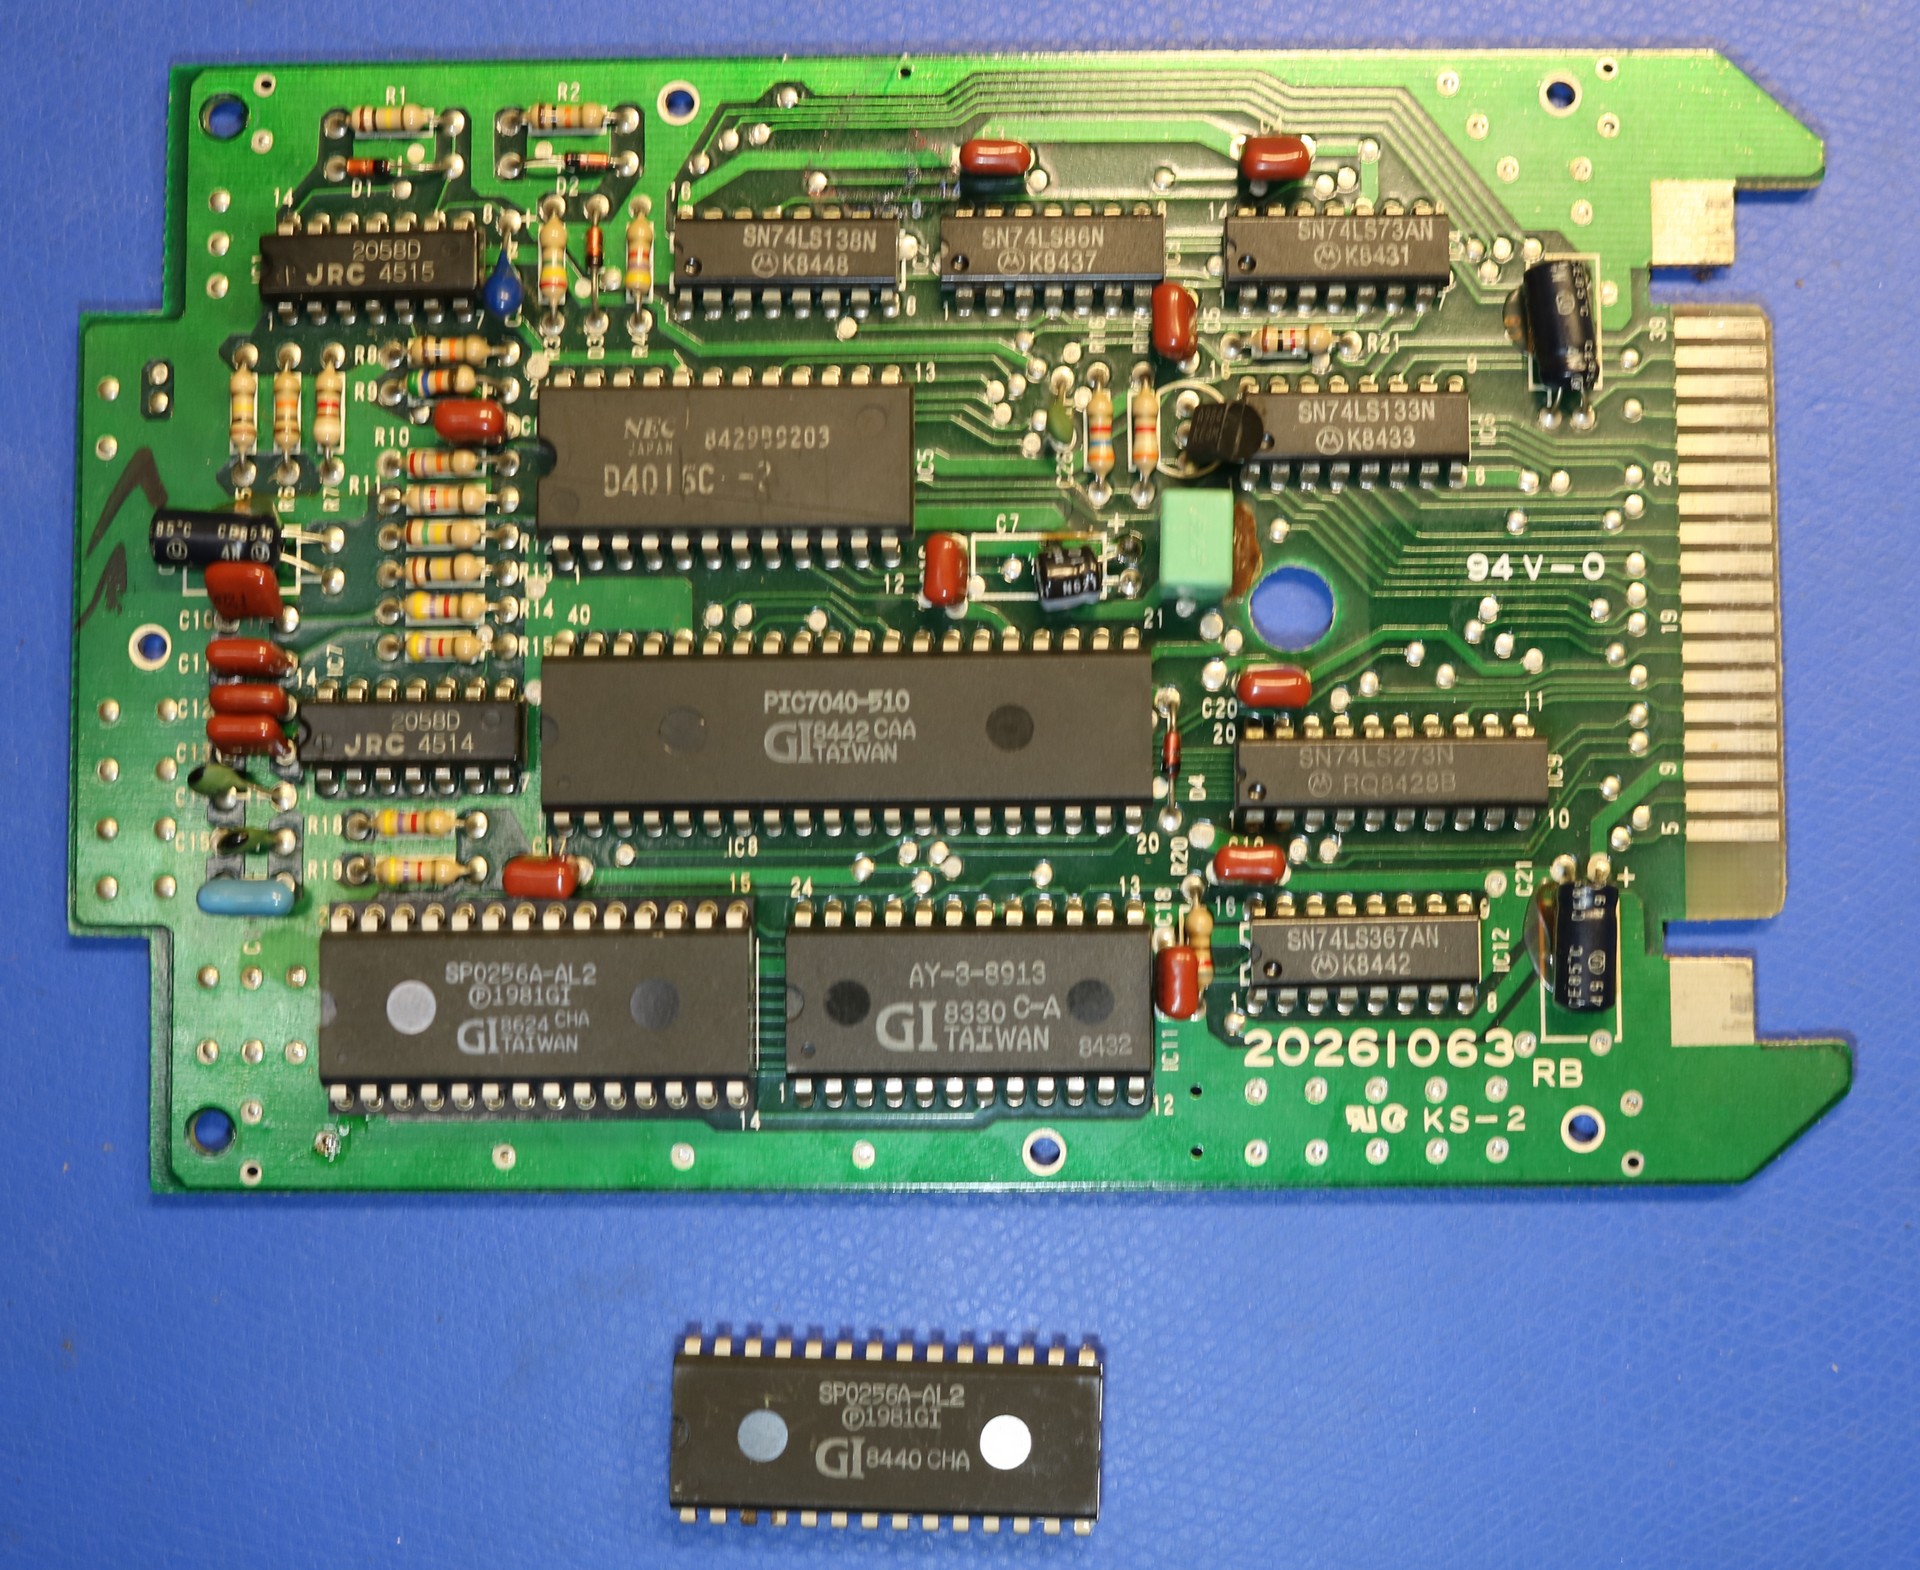
I also replaced a 10uF capacitor, just because it seemed like an easy culprit, and a failed SP0256 was about the last thing I considered. The speech/sound pak includes both a SP0256A-AL2 speech synthesizer and an AT-3-8913 sound chip. It can play pretty decent music, and it plays it right out the TV speakers. It’s a pretty well-engineered cartridge, featuring an additional micocontroller, several op-amps to ensure audio quality, etc.
Unfortunately, it wasn’t my speech synthesizer…
The Colorware Real Talker
I realized quickly that the speech/sound pak wasn’t the right one, so I set about digging out old Rainbow Magazines until I finally came across an ad for a Colorware Realtalker. I searched and searched and search and I finally found someone, Rod, who owned a Real Talker. He was kind enough to send me some pictures, and between his pictures and my looking at the Colorware software, it would have been enough for me to reverse engineer the thing. But then I decided owning the real thing would be even better, so I purchased it from him. Thanks again, Rod, that Real Talker cartridge is exactly what I remember. Almost… it turns out there are two versions, the Coco-1 version and the Coco-2 version. Rod’s was a Coco-1, powered by the Coco-1’s internal 12V supply, mine was a Coco-2 version, powered by an external wall-wart. It was close enough though, and probably the only one I’ll ever see again! Here are some pictures I took of the Real Talker:
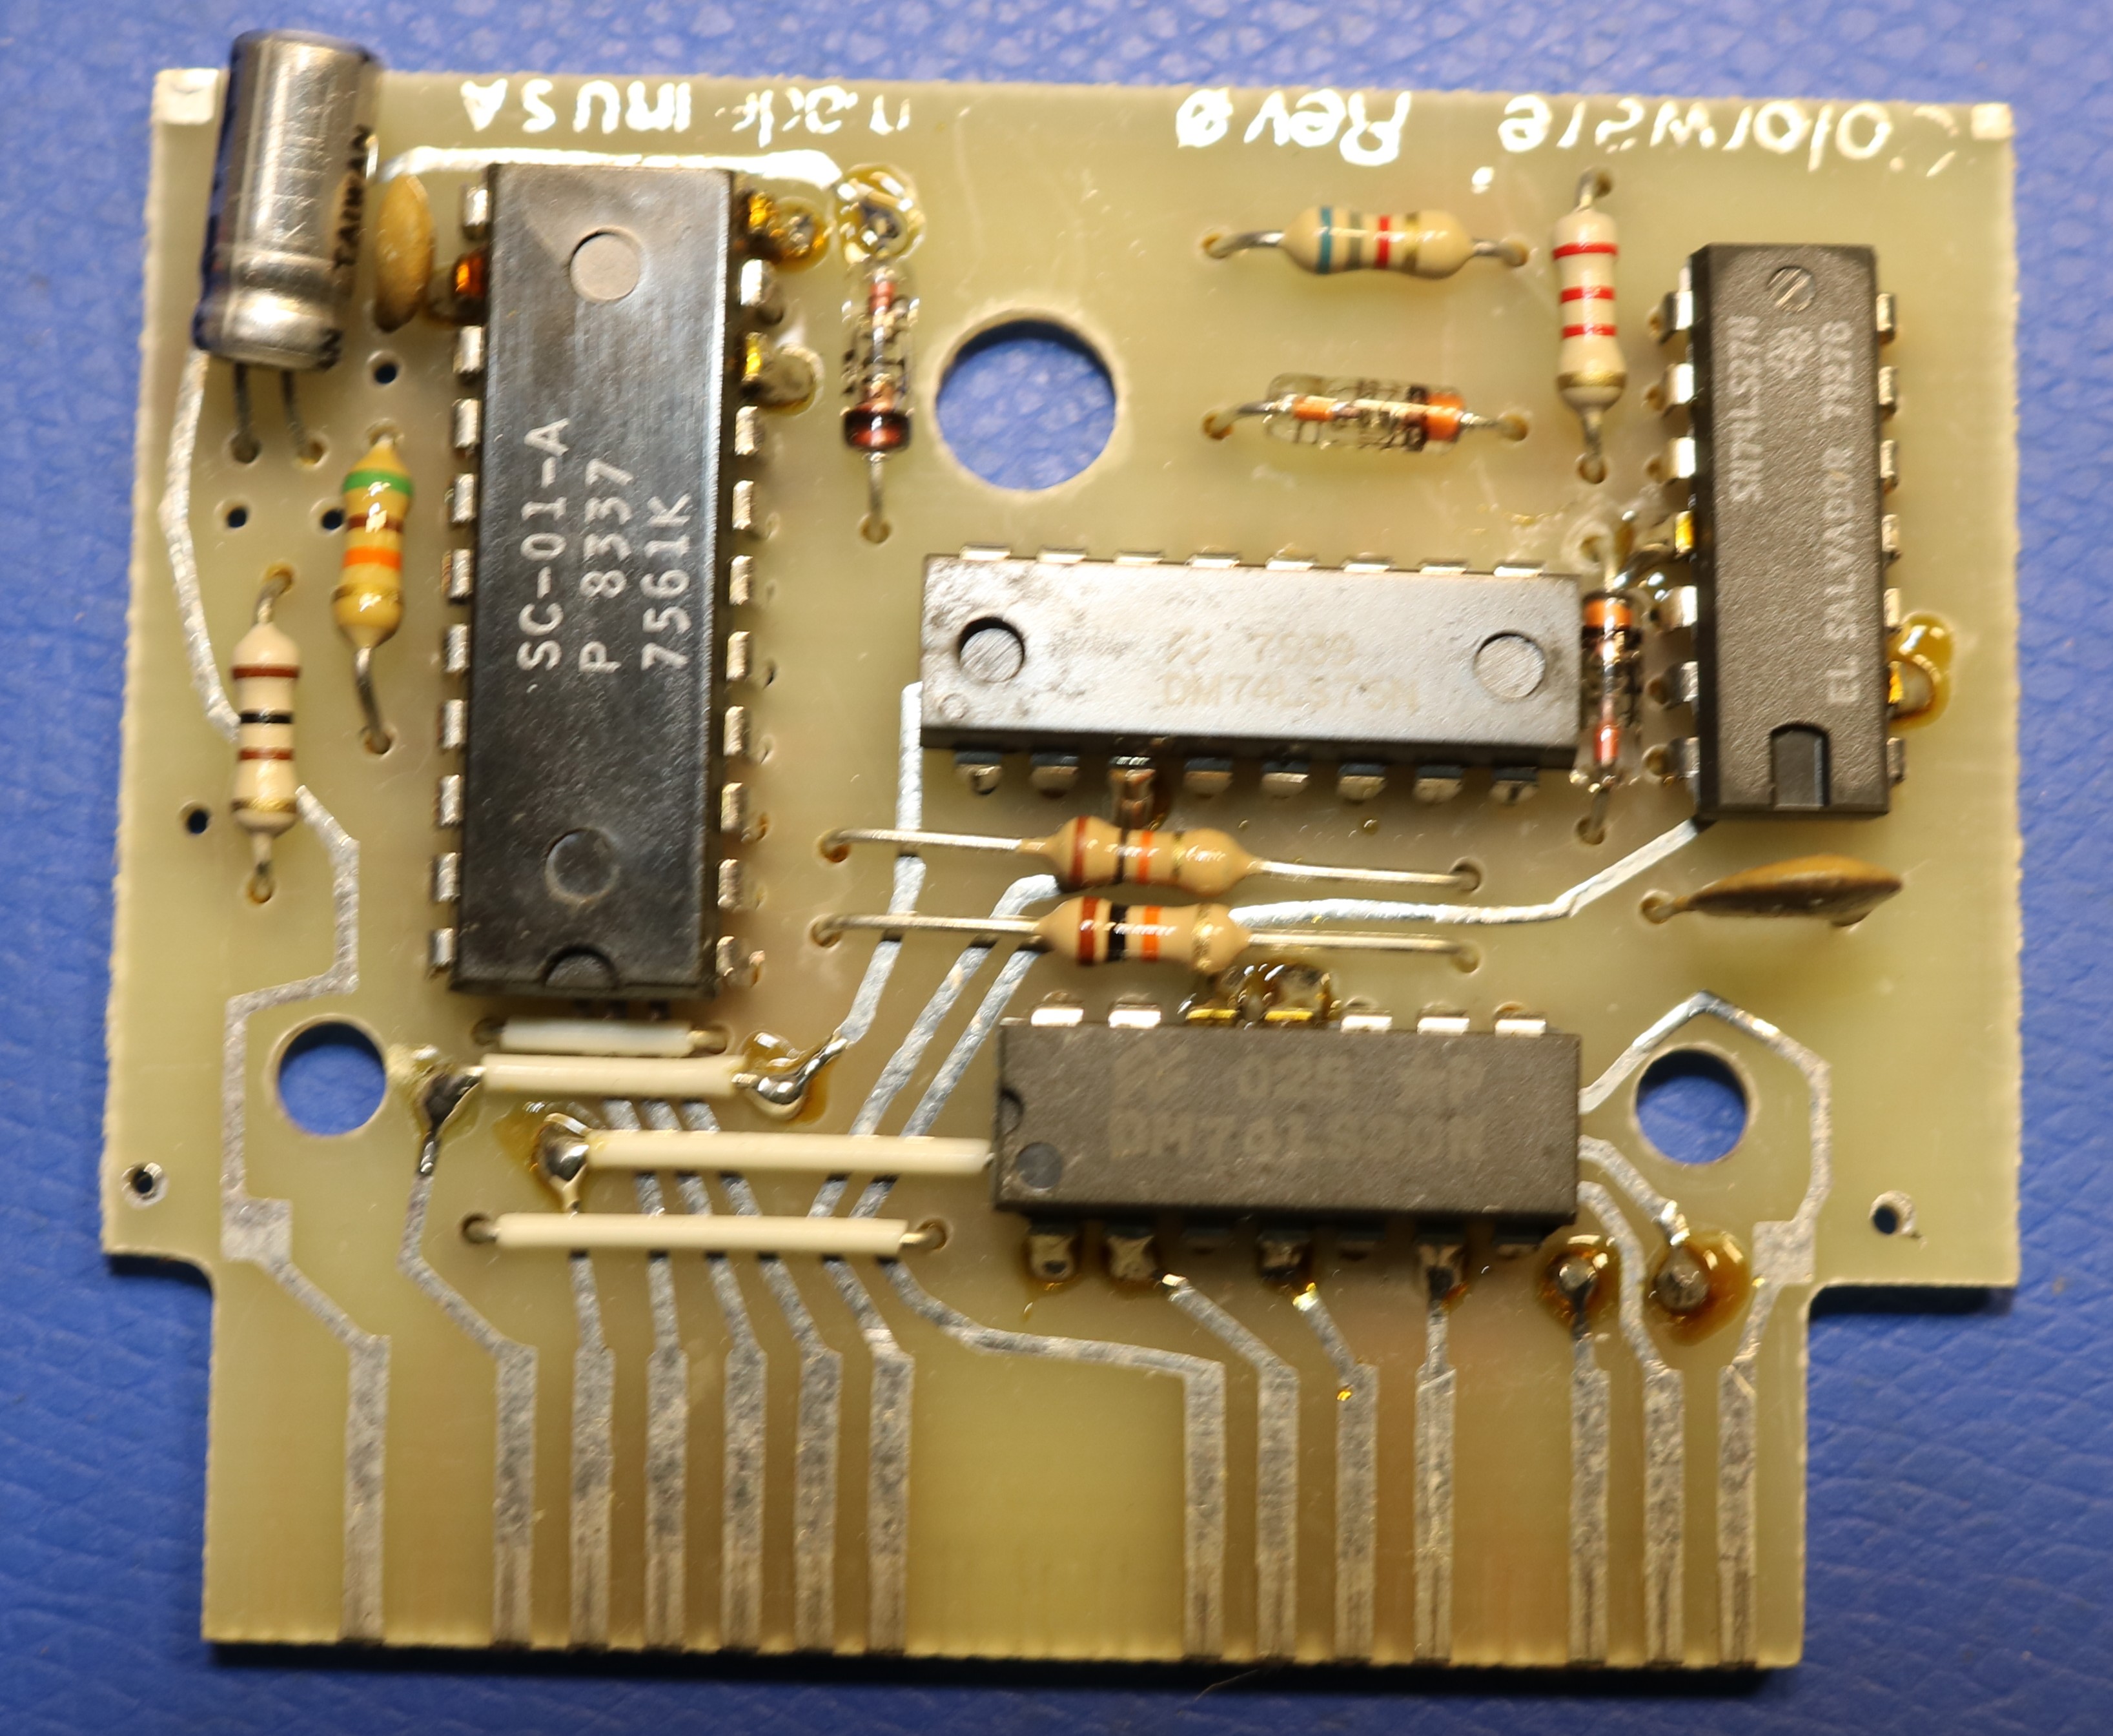
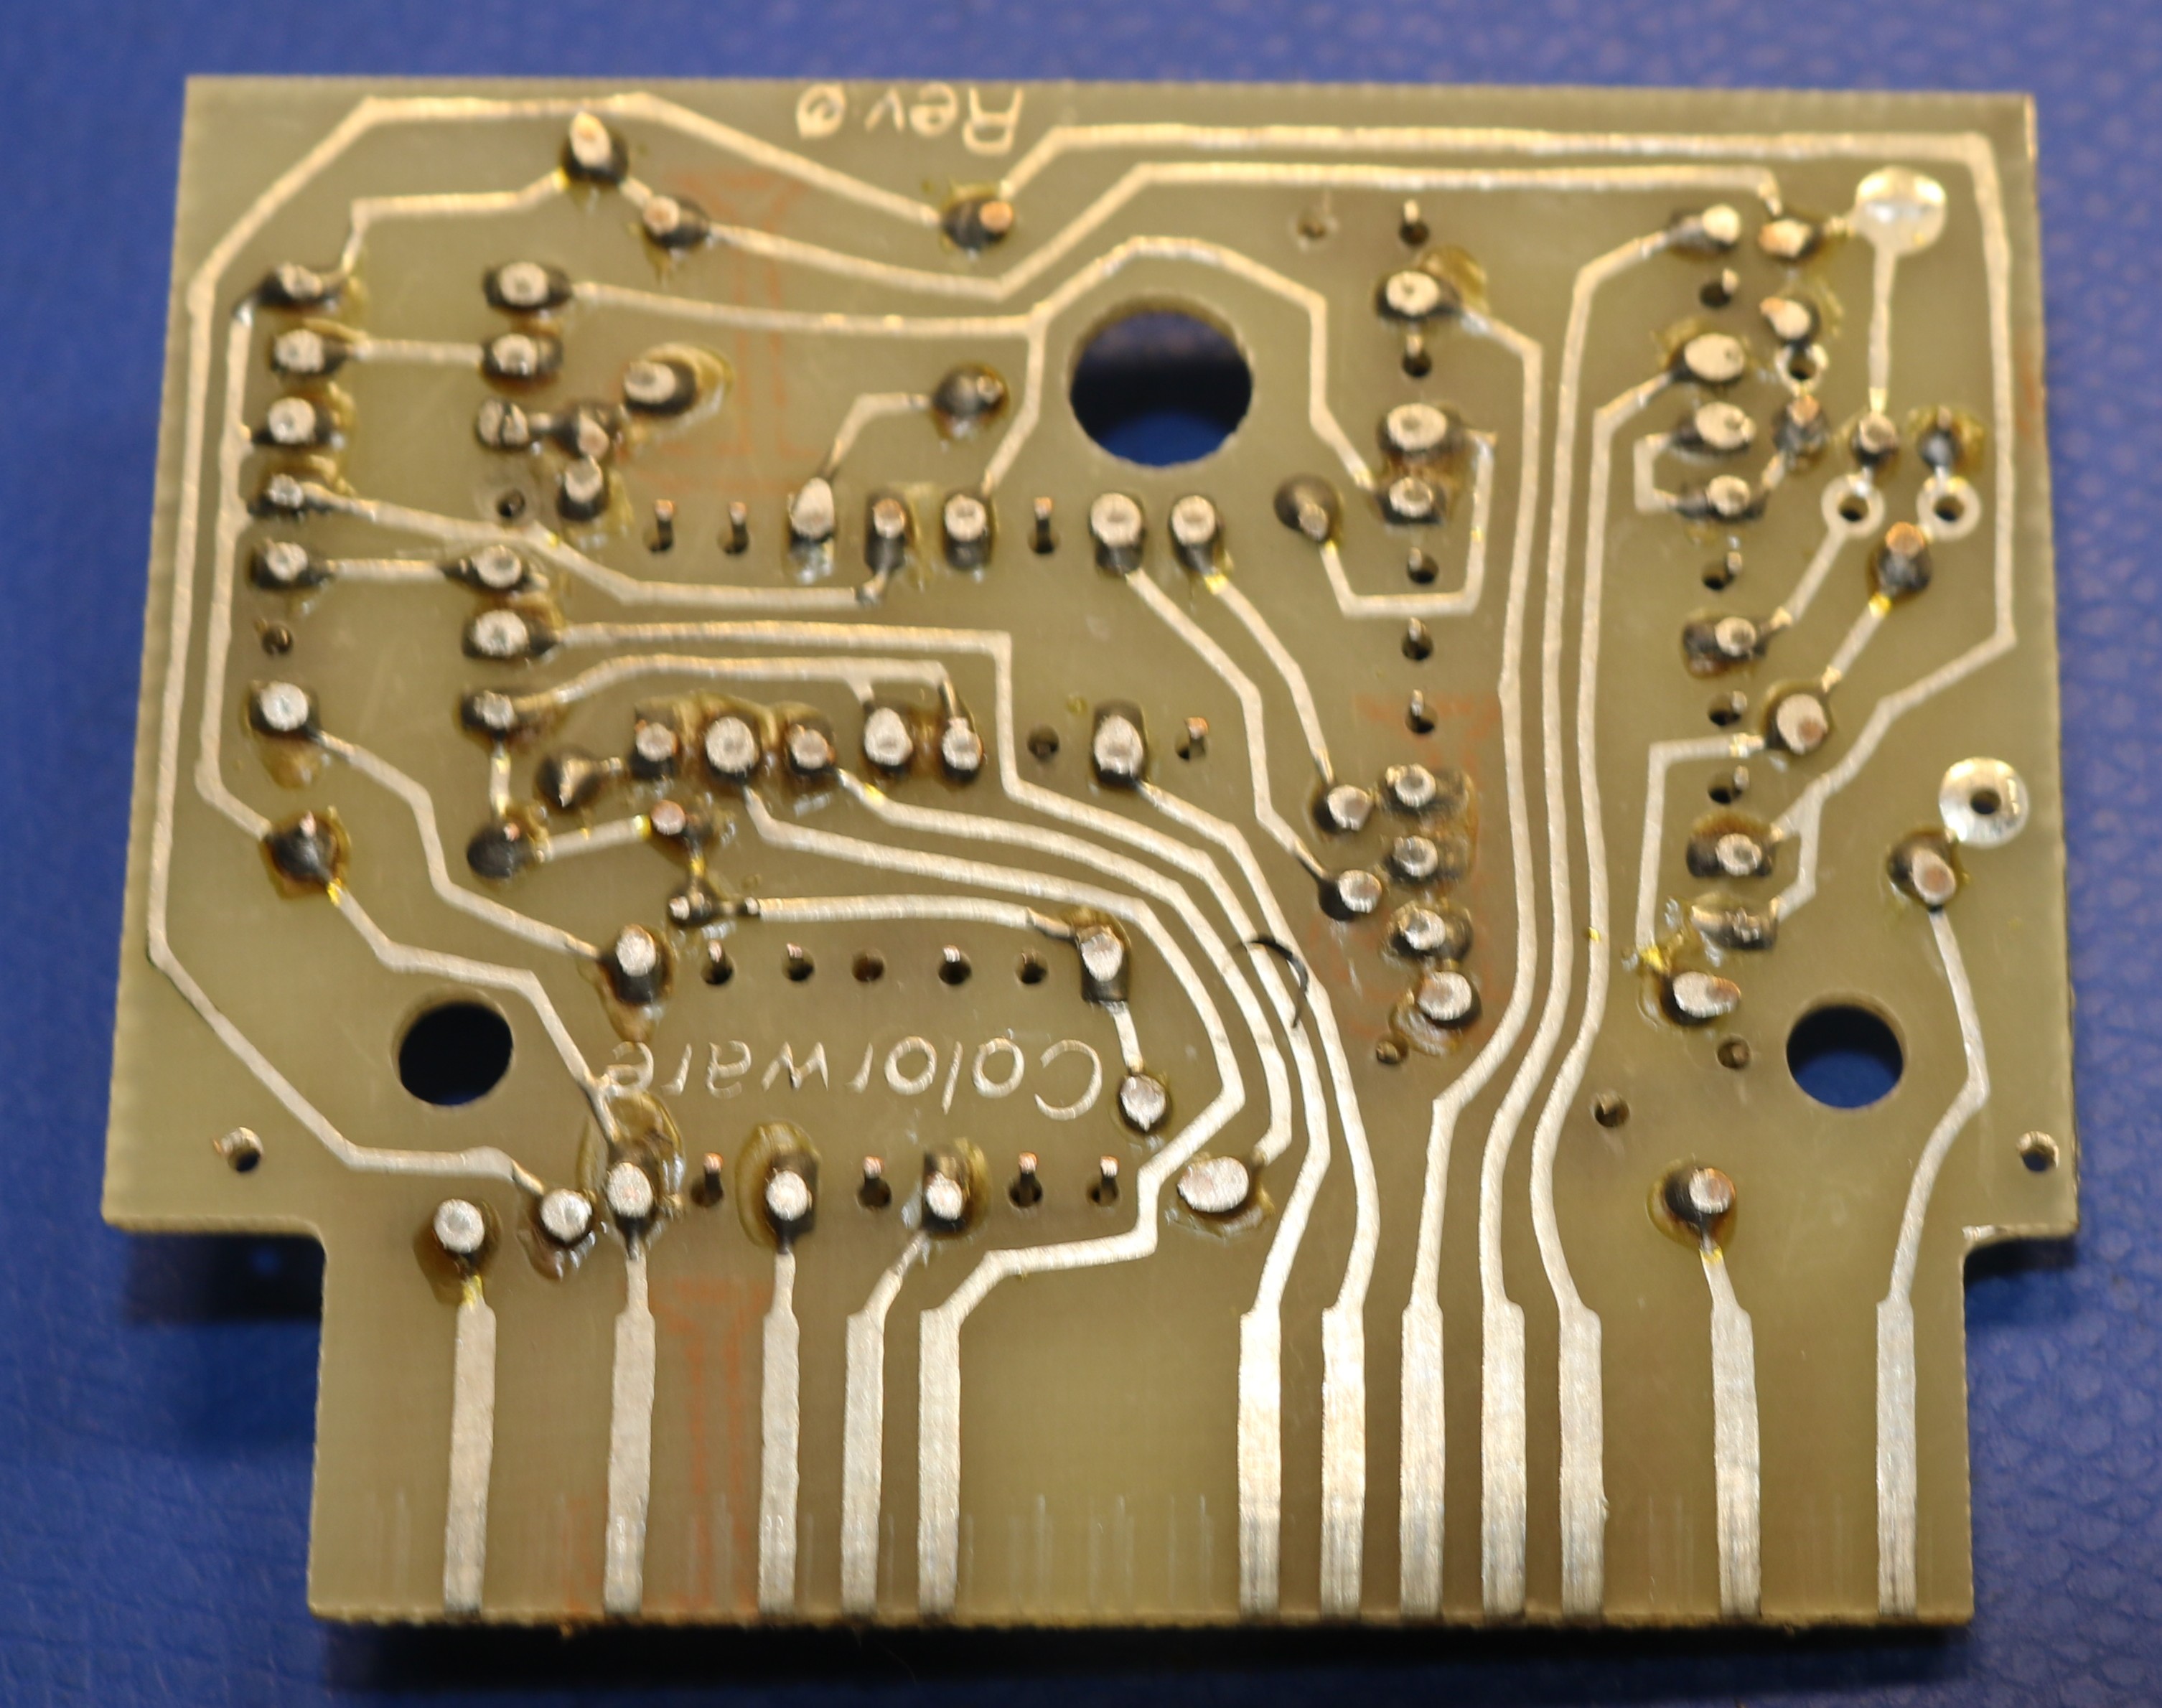
The design is pretty simple. There’s a bit of address decoding (74LS30 and 74LS27) to put the Votrax at the right address, a latch (74LS75) to latch the pitch bits, and a Votrax SC-01-A that’s tied directly to the data bus. While the Votrax is talking, a diode pulls down the HALT line on the CPU. The Coco literally can’t talk a chew gum (or do anything at all) at the same time. Below is my reverse-engineered schematic:
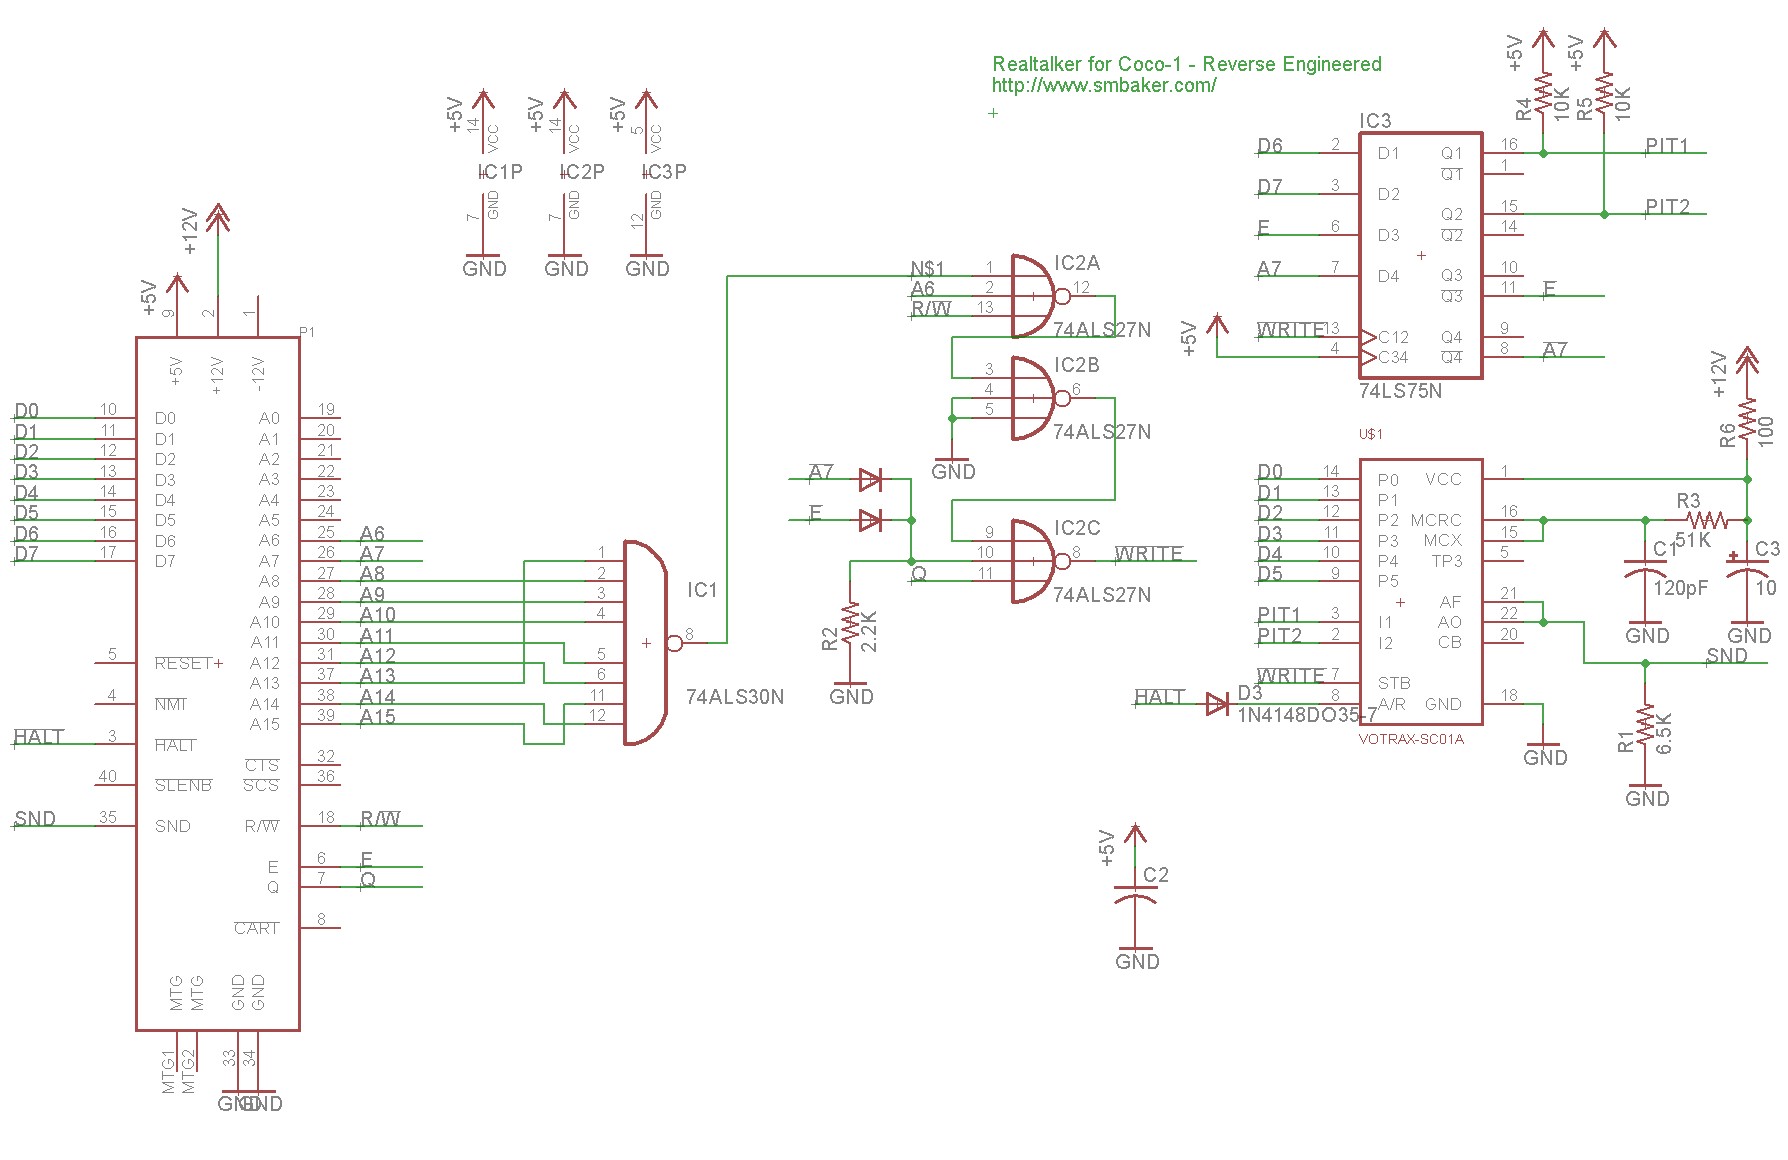
Note that the schematic is unverified. I am going to have a pcboard fabbed, and will try it out to make sure I got it right.
Also note that I ran into a couple of issues using this:
- My Coco-2 doesn’t have +12V, and this is a Coco-1 version of the Real Talker. I plugged it into my homemade Multi-Pak interface to get the +12V supplied.
- My homemade Multi-Pak apparently had a bug and wasn’t passing addresses above 0xFF7E on the bus. The Real Talker is at 0xFF82, and I spent hours trying to figure out why it wasn’t working, even resorting to desoldering the SC-01-A to make sure it was good. Eventually I found the problem with the homemade multi-Pak, and patched it to pass 0xFF82.
- The audio sounded terrible. It turns out that the Real Talker’s audio output was at too high a voltage and was being clipped by the Coco-2’s audio amplifier. This might be a side-effect of the Coco-2 not having +12V internally. Hypothetically, the Coco-2 version of the Real Talker may include a resistor divider or pot to reduce the output level. I really wish I had a schematic to know for sure. Installed a pot between the Real Talker and the Coco-2 to reduce the audio level, and the output is now perfect.
Once I vet the board design, I’ll be sure to make it public so anyone can build a Real Talker… well, at least anyone who has a spare SC-01-A just laying around.
The Colorware software is really nice, it has a binary that adds “SAY” and “CONVERT” basic statements. The “SAY” statement does text-to-speech conversion. The “CONVERT” statement will perform text-to-speech on the source of the currently loaded basic program and replace it was a translated version that no longer requires the binary.
The CocoSDC Floppy Drive
Back in the day, I owned a single full-height floppy drive for my Coco-2. Unfortunately, I have no idea where my original disks with all of my original programs are. It would have been fun to see what my old software was like. I remember writing a disk directory sorter that worked perfectly … exactly once. The second time you ran my directory sorter, it scrambled the disk. Oops.
Anyhow, I wanted a floppy drive again because floppies are a whole lot more convenient than tapes. However, they’re still finnicky often troublesome devices forty years later. Floppy drives go out of alignment. 5.25″ disks are hard to source. You’re constantly using sneakernet to walk floppies between your windows PC and your vintage PC. Better to use a Gotek. Even better to use Darren Atkinson’s CocoSDC. Ed Snider sells CocoSDC on his website too.
CocoSDC does hardware emulation of the floppy drive controller, so it works with just about anything. You store your disk images in a set of files on a SD-Card. The Disk OS includes handy commands for mounting directories. It even features flash memory and can be flashed in-place to load custom ROM images. I can’t recommend the CocoSDC enough — it’s really convenient.
I still want one of those old full-height floppy drives though, and I’m sure I’ll probably end up with one.
Resources
- My Github Repo of Coco Stuff at https://github.com/sbelectronics/coco. Here you will find a dumping ground of my coco-2 related stuff. The schematic for the Real Talker is there. The STL files for the 3D printed case for the TLE MPI is there. Enjoy… and use at your own risk.