In this video, I put together a T5745 thin client with a PCI expansion adapter and a GPIB adapter.
Background
I’ve started playing with some HP 9000 computers, both the series 200 (9836, 9920, etc) and the series 300 (model 310). With a few exceptions such as the 9836, these computers often don’t include built-in storage. They have an HPIB interface, using IEEE-488, that connects to one or more external storage devices. Common storage devices are the 9121 and 9122 floppy drive units, the 9134 hard drive, or the 9133 which is a combination floppy and hard drive.
While you can successfully find these storage devices on eBay, they’re still not all that convenient to use as you would have to preload them with the appropriate image that you want to use.
Along came HPDrive, a project that can turn any old Windows or Linux computer into a HP-compatible drive using a GPIB adapter. Unfortunately, most of the GPIB adapters are old ISA and PCI cards. There are a few newer PCIE cards, an some USB Adapters, though the USB adapters are not well supported by HPDrive at this time. Although I do have some ISA machines (Xi8088, PC 5150, etc), these are fairly large builds that I didn’t want to dedicate to serving as a HP storage device.
So I set about building the smallest affordable HPDrive computer that I could.
The T5745 Thin Client
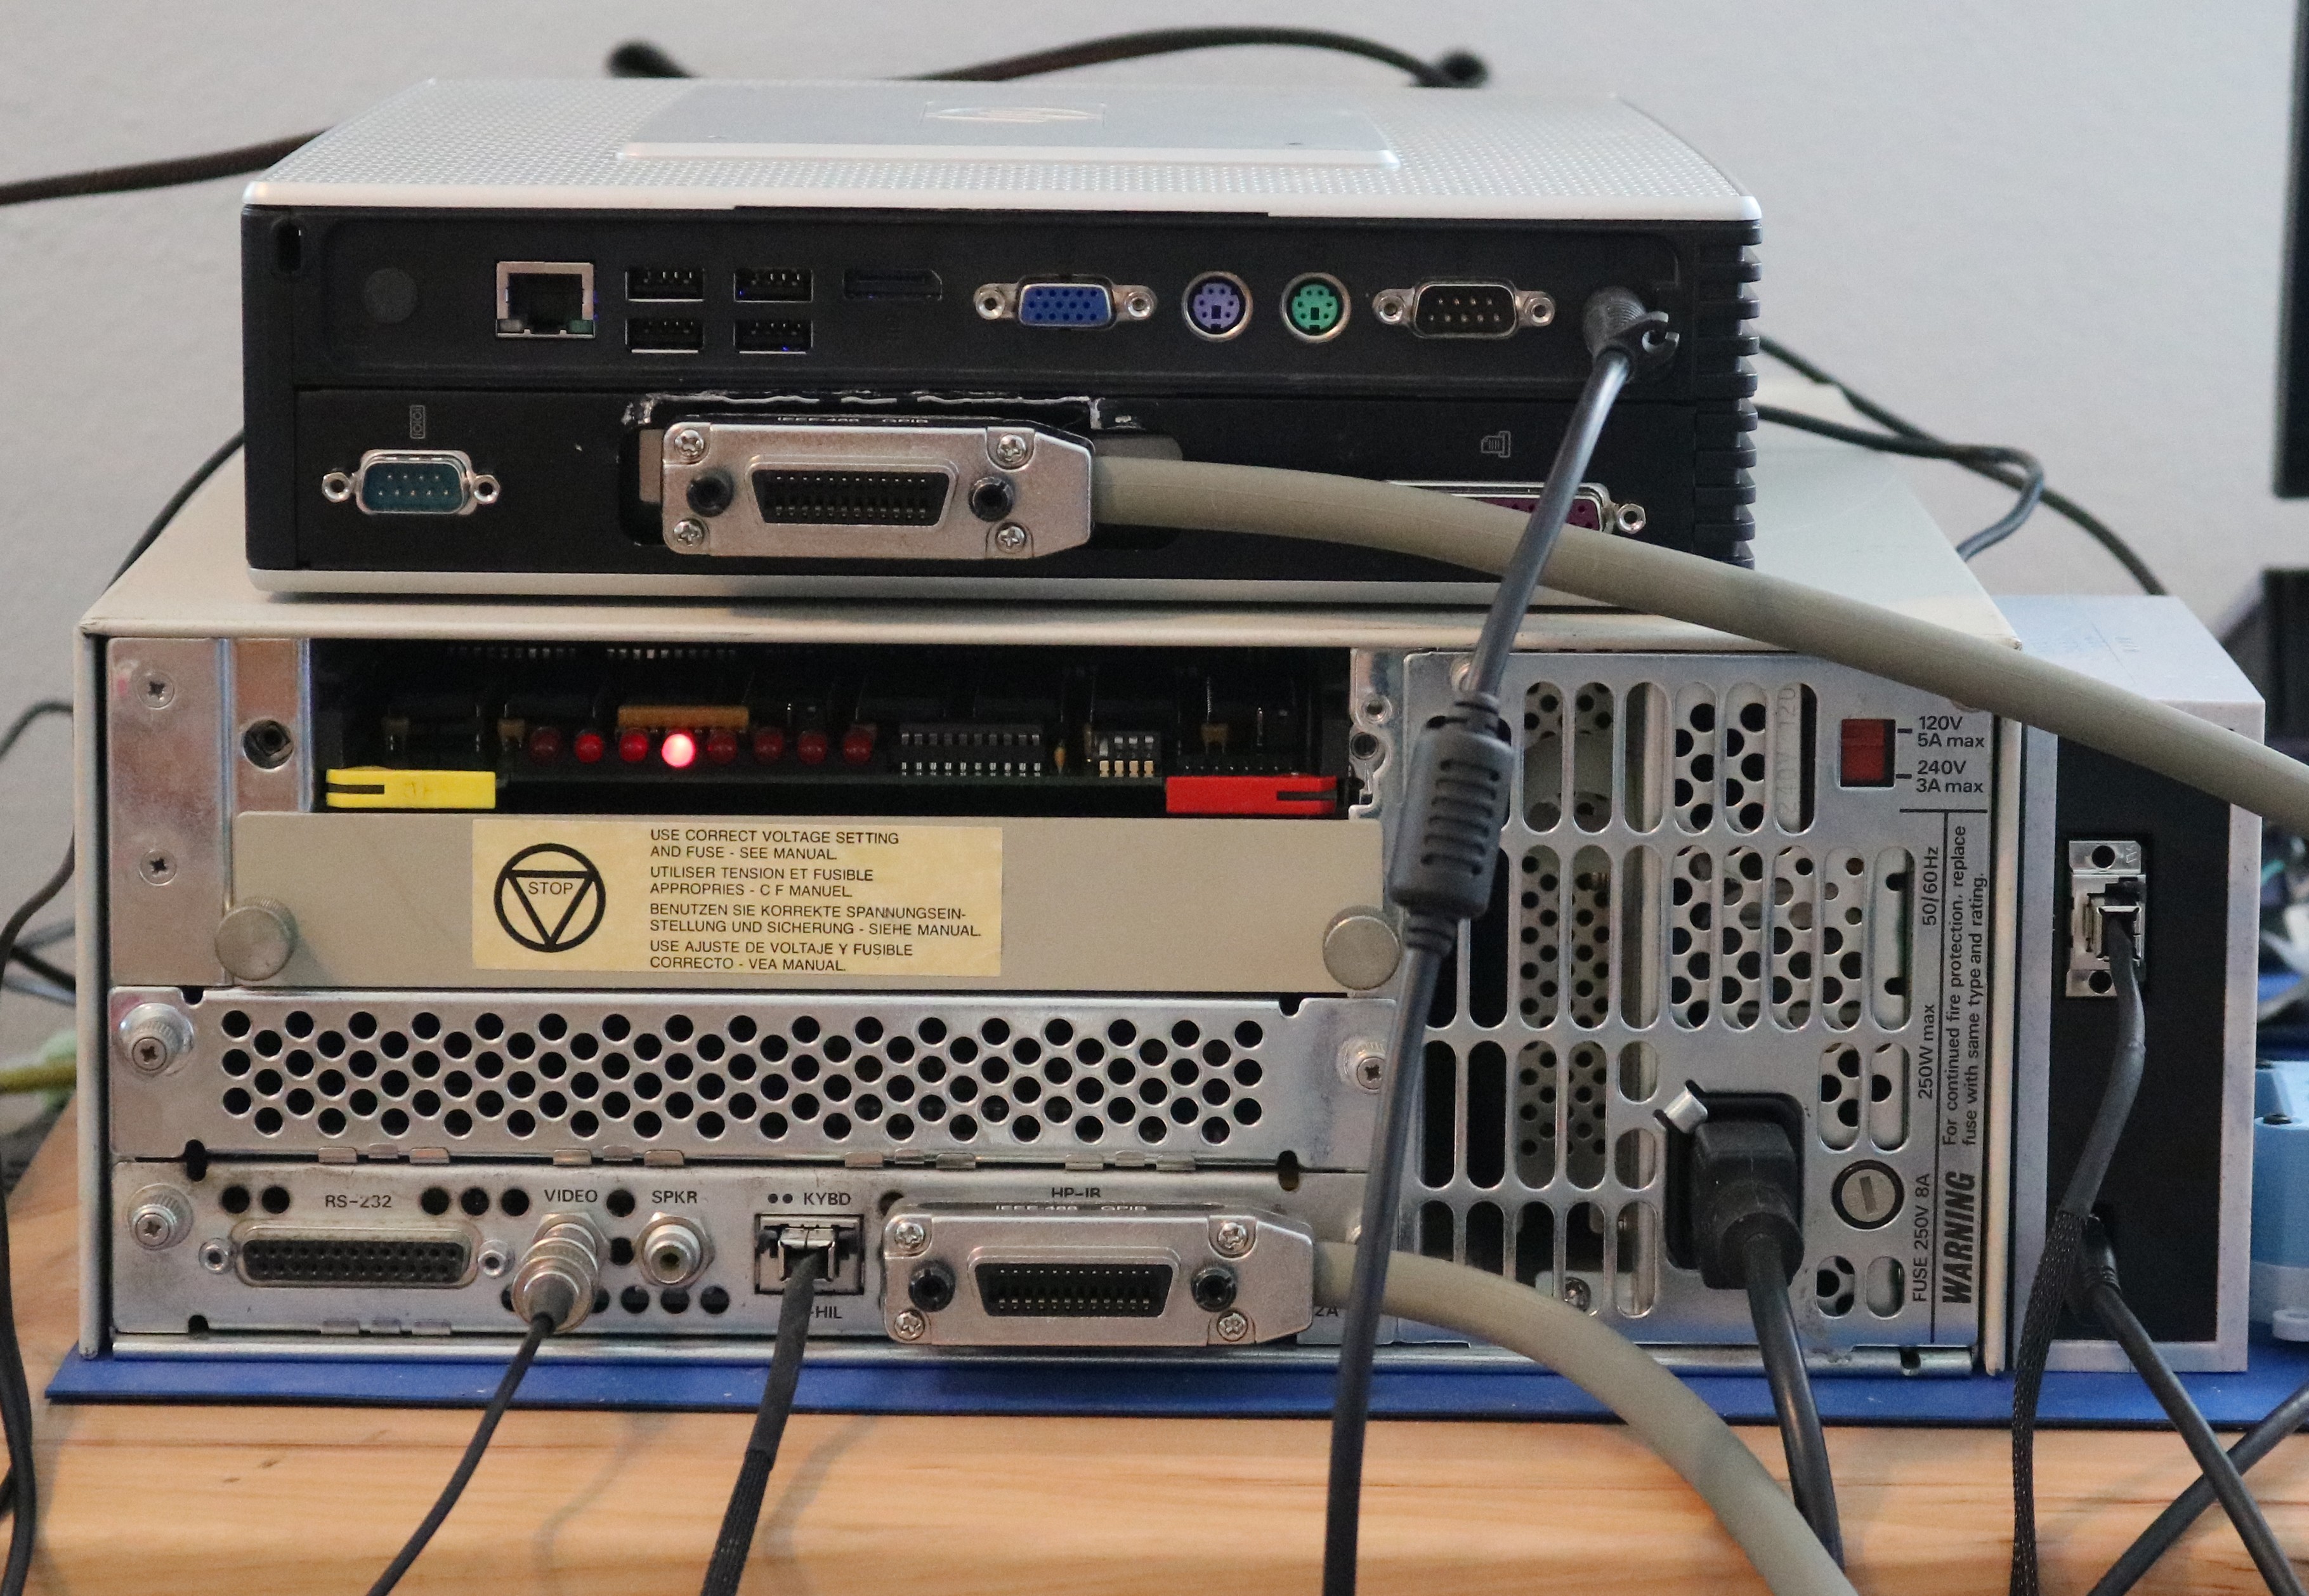
This brought me to the T5745 “thin client”. You can find these readily on eBay. It typically comes with an Atom N280 processor, 1 GB of memory, VGA video, and a typical assortment of USB and PS2 ports. This is just about the right solution for running a relatively small Linux distribution. The one thing the T5745 is missing is an expansion card slot — it doesn’t have a PCI or PCI Express slot.
However, there are new “expansion chassis” available on Amazon, for a modest fourteen bucks (what can you buy for 14 bucks shipped these days??? A T5745 thin client expansion chassis, that’s what…). When looking for this, search for “Hp T5740 Thin Client Az551aa PCI Express Expansion Module Chassis – 581264-002“.
This expansion chassis comes prepopulated with a PCI Express card adapter, but it also includes a PCI adapter that can be swapped in. Be careful buying it on eBay as some eBay listings include only the PCI Express adapter. It also has serial and parallel ports and a small fan. The first step is to swap the PCI Express adapter board with the included PCI adapter board.
Strangely, the PCI board doesn’t include a header for the fan, so you can toss the fan if you want. Perhaps the PCI Express specification allowed for higher-wattage components that needed active cooling, whereas maybe PCI does not. Or perhaps the fan interfered with the typical PCI card form factor. Regardless, I left the fan unconnected.
I did have to do a little bit of surgery (with a wire cutter and pliars) on the expansion chassis where part of the metal was interfering with the relatively large HPIB cable connector. A dremel would have made cleaner work of it.
NOTE: Some thin clients you find on eBay do not include the power brick. Plan to pick one up, build your own, or repurpose a power brick from another piece of equipment. My power brick is an HP-branded one, with the label “U1000EA”. It measures 19.5V on my bench fully unloaded using a multimeter. I bought it under the eBay listing “GENUINE HP Thin Client T510 T5565 T5570 T5740 T5745 65W AC Power Supply Adapter”.
Selecting a GPIB Card
The HPDrive documentation has a list of acceptable models. I went for a National Instruments PCI-GPIB Card. The specific listing I used had the title,
"National Instruments PCI-GPIB 183617J-01 IEEE 488.2 Interface Adapter"
That listing on eBay is now out of stock, but I’m sure you can find similar NI PCI-GPIB adapters.
Storage
The T5745 I received did not have any storage, but it did have an internal unpopulated IDE header. This header is for a disk-on-module, such as the Transcend TS4GDOM44H-S. My speculation is the thin clients originally came with a DOM module like this, but perhaps it was removed for data security reasons. Using something like the transcend will return the thin client to the original design. Alternatively, the T5745 has multiple USB ports, including two USB ports that are conveniently hidden inside the case, where USB storage could be plugged in.
Installing Ubuntu
Next I installed Ubuntu 16.04. I chose 16.04 because I needed a 32-bit variant for the atom N280 processor. Newer 64-bit versions of Ubuntu will not work.
Ubuntu installs from a USB thumb drive. You put the USB stick in the desktop machine of your choice (I used my Windows 10 desktop), and then run a USB image burning tool to burn the Ubuntu image to a USB stick. You can then use this USB stick as installation media on the thin client. I think I probably used “balenaEtcher” to burn the USB image, though I’m not 100% certain. There are several alternative programs that could be used.
My first install was a little bit problematic as I ran out of disk space shortly after installing. The transcend DOM only has 4GB of storage space, and Ubuntu 16.04 will eat up a huge chunk of that. I reinstalled and reduced the size of the swap partition substantially (down to 0.3GB). We don’t really need swap in such a small deployment like this, and I was able to free up a significant amount of space. An alternative as described previously would be to use a USB thumb drive instead of the transcend module. You can easily get USB thumb sticks in the 32 GB or 64 GB range, which would have plenty of space.
We don’t really need swap in such a small deployment like this, and I was able to free up a significant amount of space. An alternative as described previously would be to use a USB thumb drive instead of the transcend module. You can easily get USB thumb sticks in the 32 GB or 64 GB range, which would have plenty of space.
My notes show that I had to fuss with some grub settings to get Ubuntu 16.04 to boot. This is what my notes say:
# If Ubuntu hangs during "free smp alternatives memory", boot
# using recovery mode and do this:
sudo emacs /etc/default/grub
GRUB_CMDLINE_LINUX="dis_ucode_ldr"
sudo update-grub
YMMV, but that’s what I had to do.
Building the Linux GPIB Driver
Here you want to follow the Linux instructions in the HPDrive README.
NOTE: The commands I use below might not necessarily be the same as what you’ll do depending on specific hardware. I suggest you read and understand the HPDrive documentation. My commands are listed as a reference.
The first thing I did was to install the right kernel:
# Download and install the kernel that HPDrive wants...
wget https://kernel.ubuntu.com/~kernel-ppa/mainline/v4.0.3-wily/linux-headers-4.0.3-040003-generic_4.0.3-040003.201505131441_i386.deb
wget https://kernel.ubuntu.com/~kernel-ppa/mainline/v4.0.3-wily/linux-headers-4.0.3-040003_4.0.3-040003.201505131441_all.deb
wget https://kernel.ubuntu.com/~kernel-ppa/mainline/v4.0.3-wily/linux-image-4.0.3-040003-generic_4.0.3-040003.201505131441_i386.deb
sudo dpkg -i *.deb
Then I updated grub to automatically boot to that kernel:
grep submenu /boot/grub/grub.cfg
grep gnulinux /boot/grub/grub.cfg
sudo emacs /etc/default/grub
# Inside emacs, put a > between the two ids grepped above
GRUB_DEFAULT="gnulinux-advanced-98f2e22d-949b-4de9-96f6-ffb1c380bed2>gnulinux-4.0.3-040003-generic-advanced-98f2e22d-949b-4de9-96f6-ffb1c380bed2"
sudo update-grub
Reboot, make sure it boots cleanly, and make sure that “uname -a” shows the same kernel that you installed. Then I built the driver.
sudo apt-get install build-essential

wget https://sourceforge.net/projects/linux-gpib/files/linux-gpib%20for%203.x.x%20and%202.6.x%20kernels/4.0.3/linux-gpib-4.0.3.tar.gz/download -O linux-gpib-4.0.3.tar.gz
tar -xzf linux-gpib-4.0.3.tar.gz
cd linux-gpib-4.0.3
# Assumes this file is in the parent directory; it comes from HPDrive
cp ../linux-gpib-4.0.3.patch .
patch -p1 < linux-gpib-4.0.3.patch

./configure
make
sudo make install
Next, configure the gpib driver to match your board (your board may differ from mine; pay attention to the HPDrive instructions about seeing what your drive’s ID is):
sudo emacs /etc/gpib.conf
# insert the following configuration using emacs
interface {
        minor = 0       /* board index, minor = 0 uses /dev/gpib0, minor = 1 uses /dev/gpib1, etc. */
        board_type = "ni_pci"   /* type of interface board being used */
        name = "gpib0"  /* optional name, allows you to get a board descriptor using ibfind() */
        pad = 21        /* primary address of interface             */
        master = yes    /* interface board is system controller */
        pci_bus = 1
        pci_slot = 6
}

sudo modprobe tnt4882
sudo /usr/local/sbin/gpib_config --minor 0
The HPDrive documentation will have you run a command or two to ensure that the driver is working as expected, and that the software connects to the driver.
Optional — Setting up a Pi-KVM to interact with your HP 9000 Computer via your modern PC.
One of the things I show in the video is the use of a Pi-KVM. I like doing this because it allows me to play with a piece of retro equipment over from the convenience of my comfortable desk, using my big monitor and my nice keyboard. I prefer this to having to scrounge up an old CRT tube, buy an overpriced old keyboard, etc.
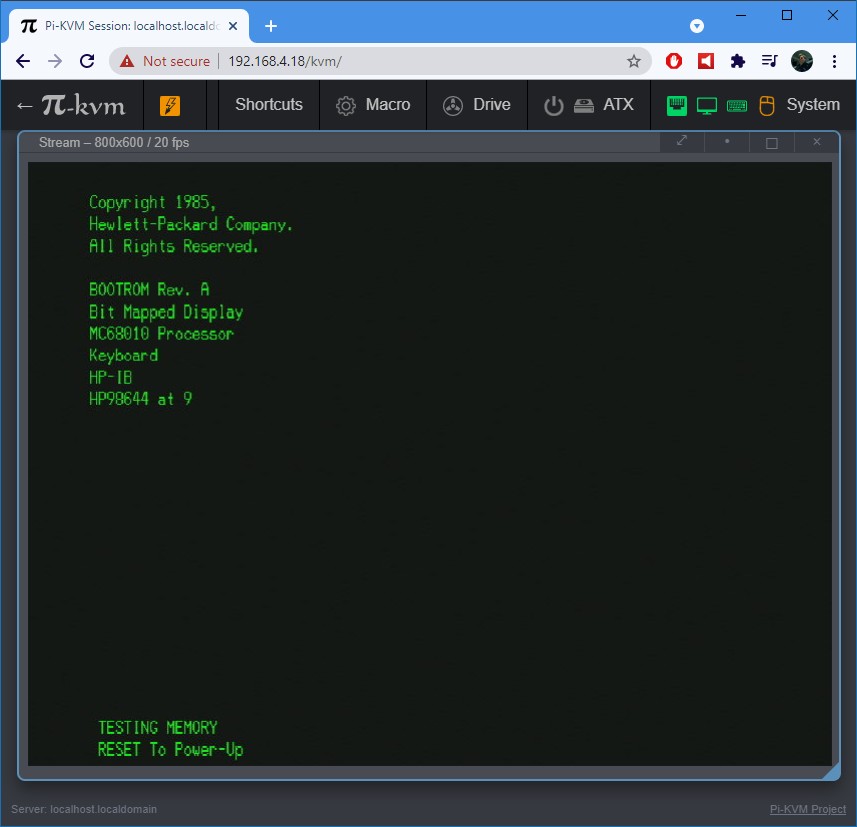
The pi-kvm website will walk you through building a Pi-KVM if you want to follow in my footsteps.
For an HP 9000 series computer, you’ll probably also need a scan converter. For my 9920 and my 9000/310, a GBS-8219 scan converter worked perfectly. This will take the single-RCA composite connector and output VGA video (which you can in turn feed to the Pi-KVM or to the VGA monitor of your choosing). A GBS-8200 will also suffice and can be had cheaper than a GBS-8219.
The video on a HP9836 was a bit more troublesome to deal with, and I ended up hacking an MCE2VGA board. But that’s a story for a different blog post…
To use a modern keyboard, or to use the Pi-KVM’s emulated keyboard, with a 9920 or 9000/310 or similar 9000 series computer, you’ll have to go through a few more hoops. The really old ones (9920) use a weird proprietary clocked shift protocol. The newer ones (9000/310, etc) use HP-HIL, which is at least reasonably well documented. Fortunately, Anders Gustafsson has developed PIC-based converters for both of these computer over to the USB HID keyboard protocol. I’ll leave you to Anders’s site to work out how to do this, though I’ll probably document my setup in a future blog post.