I’ve been playing with some old CTOS-based Convergent NGEN (Burroughs B25, B26, etc) workstations lately. Documentation on these is a little bit sparse, so I decided to keep a log of my notes.
This blog post is going to concentrate on running the CTOS operating system on actual period-accurate hardware — not on a virtual machine, PC, or other modern hardware. The specific hardware that I used for most of these observations was an 80186-based CP-001 with the MFM hard drive unit (HD-003).
Online Resources
The following resources are your best friends while trying to restore a convergent NGEN or burroughs B26/B28/etc computer:
- Bitsavers Manuals, http://www.bitsavers.org/pdf/convergent/ . This is a set of random manuals (probably not the manual you need!) and random pictures (probably not the picture you need!) and other goodies. There’s lots of stuff here, but it’s also pretty incomplete. If you do have a manual that is not present, then please consider scanning it in and posting it to bitsavers.
- Bitsavers Disk Images, http://www.bitsavers.org/bits/Convergent/ . This is a lot of disk images for various convergent computers. There are gaps, and some of the images are in 3.5″ format which presents problems for a 5.25″ NGEN computer. The amount of stuff here is a huge resource. If you have disk images or operating system versions that are not present, then please consider uploading it to bitsavers!
- The CTOS FAQ Website, https://www.oocities.org/siliconvalley/pines/4011/ . This is on oocities which is a reconstructed copy of geocities. There’s some goodies here, including freeware tools and documentation for freeware tools.
Operating system images
Find these at bitsavers, http://www.bitsavers.org/bits/Convergent/ . There are a lot of different images here, even some of them represented multiple times on different media. The images I have personal experience with, more or less in the order I tried them, are:
- B20 Diagnostics, Nov 86. I booted off the first disk. This is a really nice set of diagnostics that will autodetect a lot of hardware (at least the CPU, HDD/FDD, dual FDD, monitor, and keyboard).
- CTOS 4. http://www.bitsavers.org/bits/Convergent/ngen/5_btos_4/ . This is the one that worked for me when I was trying to figure out the monitor pinout and didn’t have the monitor detect pin connected. The other ones gave me a lot of trouble. Or it could have been other hardware issues I was experiencing…
- CTOS 8. http://www.bitsavers.org/bits/Convergent/ngen/5_btos_8/ I used the one that’s in the zip file., 8.0.2.
- CTOS II-1.0. http://www.bitsavers.org/bits/Convergent/ngen/5_imd_set2/ A bunch of files that start with “ctii-“. I picked this one because it seemed relatively complete.
- Standard Software 11.3. http://www.bitsavers.org/bits/Convergent/ngen/5_imd_set2/ The 11.3 standard software and OS is newer than the CTOS II-1.0 in the same directory. I didn’t have any luck installing it from scratch as I got a crashdump when it did the boot continuation from the real mode floppy to the boot continuation. I did have some success installing the standard software right over the top of my existing II-1.0 install.
- Standard Software 12.0 / OS 3.2. http://www.bitsavers.org/bits/Convergent/ngen/floppies_7/ . This is a relatively recent modern version of the software, including the new Installation Manager. Unfortunately as far as I can tell there is no real mode install disk. There is a protected mode install disk — I was able to install using 80286 hardware, then downgrade my installation from protected mode to real mode (by installing the B26 OS).
If actual hardware isn’t your thing, then you can find a virtual box VM what you can run on any modern PC at http://www.bitsavers.org/bits/Convergent/ngen/ in the ctosvdi.7z archive. This VM comes with CTOS III configured for modern (virtualized) resources, including a 1.44MB floppy drive. The keyboard emulation is wonky, especially when using the editor.
But I don’t have a working MFM hard drive anywhere!
Don’t fret, if you have an HDD/FDD unit, but the hard drive has either been removed or gave up it’s life back in the days MTV was still a station you’d tune in to watch music videos, there is an alternative.
The MFM emulator, https://www.pdp8.net/mfm/mfm.shtml , is a gizmo you can build that looks to the vintage computer like a plain ordinary MFM hard drive, but is in reality a tiny embedded linux PC. You can build this thing yourself with moderate soldering skills (if I recall correctly, the designer can solder the few SMD components that need soldering for a fee). One of the side benefits is that it’s really easy to take a snapshot of the emulated disk image, and restore it if/when needed.
If your NGEN came with a SCSI disk (wow! you’re lucky, those were the high end ones), then there are also SCSI emulators. I have used the scsi2sd adapter successfully with a convergent 386i computer, and I have plans to build an RASCSI.
The combination of MFM emulator (for the hard drive) and Gotek (for the floppy drive) makes a vintage computer a lot more practical to work on that it was back in the day.
But I don’t have a monitor! What will I do????
So you managed to get your hands on a NGEN computer, but you don’t have a working monitor for it, and you popped the case and it has this weird DB25 plug instead of a sensible monitor connector. Then you looked for monitors on eBay and found a ghost town…
I wrote up a whole blog post on this topic, https://www.smbaker.com/restoring-a-convergent-technologies-ngen-pc-workstation-burroughs-b25-unisys , where I developed a breakout board that allowed me to use the NGEN computer with a much more readily available IBM 5151 monitor, or even with a MCE2VGA converter. Either of these is a solution that you can use to get your NGEN working on something other than the uber-rare convergent monitors.
But then you’re faced with the keyboard problem. Maybe you have an NGEN computer, and maybe you’re even lucky enough to have a monitor (or you followed my breakout instructions), but you don’t have a keyboard. These come up occasionally on eBay so you might not be completely ought of luck. I don’t have a good alternative yet, but I’m told the serial protocol is relatively simple, and I might try implementing a Convergent<->PS2 keyboard adapter.
Multitask like it’s 1984
CTOS actually supported multitasking using a program called the “context manager”, and it even supported it on an 80186. This was relatively novel for PC-like machines the time… DOS had a few addons like TopView, but I remember most of my DOS-based workflow in pre-286/pre-386 machines being single tasked.
Once you’ve installed context manager, you can start it with “Install Context Manager” (loading a service seems to often be called “installing” it, in CTOS-speak). The context manager can be used the launch a variety of programs, such as the word processor. It comes relatively sparsely configured, but you can add additional commands to it. Once running a program under the context manager, press ACTION-GO to switch back to the context manager where you can choose a different program.
If you have sufficient memory, then it may try to leave multiple programs running at the same time. If you’re light on memory, then it might swap out programs to make room. It tends to swap out a whole program at a time, rather than a more modern virtual memory approach of swapping at the level of pages. But, this is 1984, and this is a real-mode CPU…
There are several different generations of context manager. The older real-mode versions seem to work by reserving fixed “partitions” of memory. For example, on my 768K 80186 system I created two 230K partitions, and left the rest to the OS. This would let me run two programs simultaneously. You could create more partitions of a smaller size, but then you would only be able to run smaller applications in them. I haven’t yet installed a protected mode version of the context manager on the 286 hardware yet, it’ll be interesting to see if the protected mode version is more flexible.
Get the debugger
The debugger is really handy if you’re trying to poke around in the memory of this machine. For the CTOS-II build, the debugger installed as part of the development tools (along with the assembler and linker).
Once installed, the debugger will respond any time you hit ACTION-A. Then you can read and modify memory addresses at will. For someone familiar with the DOS DEBUG command, I found the UI of the CTOS debugger to be bizarre. There’s a lot of using arrow keys and hot keys to do things. It’s not self-evident, you’ll want to read the manual. You can find it at http://www.bitsavers.org/pdf/convergent/manuals/A-09-00320-01-A_Debugger_Manual_Nov83.pdf
Reading 1.44MB images on your 5.25″ convergent/unisys/burroughs hardware.
A bunch of the bitsavers disk images are in 1.44MB 3.5″ disk format instead of the 630KB 5.25″ format that my NGEN cp-001 80186 workstation supports. I went to a lot of effort to figure out how to make my machine read those images.
For the purposes of this section, let’s assume that you’re using a floppy emulator, like a gotek. The gotek will accept floppy images on a USB stick and serve them to the computer, pretending to be a real floppy disk. Using a gotek firmware called flashfloppy, you can make the gotek serve just about any image format, real or imaginary. So we can serve a 1.44MB image to a computer that’s expecting a 630KB image. Unfortunately the NGEN workstation won’t work with that as-is.
The first step is to figure out how the operating system configured those images. There’s a set of “Disk Control Blocks” (DCBs) that define the parameters for the disks. To get to the DCBs, follow this pseudocode:
- dgroup_seg = [0:0x242] # get the segment of the OS dgroup
- dcblist_ofs = [0x27C] # get the offset to the list of DCB pointers
- while true:
- dcb = [dgroup_seg:dcblist_ofs] # get the offset to a dcb
- if dcb == 0 then return # stop when you hit the end of the list
- dcblist_ofs += 2 # point to the next dcb
Inside of each dcb are a set of parameters for the disk. Here’s what my DCB for f0 looked like:
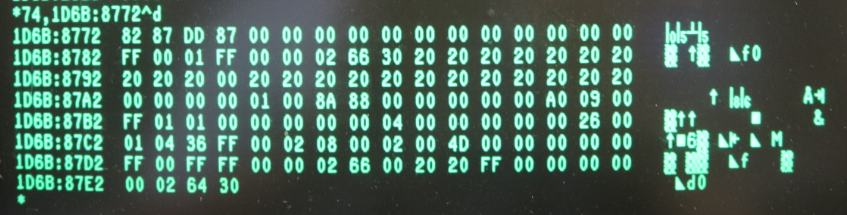
The CTOS disk structures guide at http://bitsavers.org/pdf/convergent/manuals_btos/BTOS_CTOS_Disk_Structures.pdf will tell you how to decode this structure. In particular look at the part that’s “08 00 02 00 4D 00”. This is the number of sectors per track, heads, and cylinders per disk respectively. All we need to do is to change the 4D to something really big. I changed it to B4, which represents a 180 track disk. 180 tracks / 8 sectors / 2 head / 512 bytes per sector is exactly the size of a 1.44MB floppy.
You can change the DCB by using the debugger, or you can use a program I wrote at https://github.com/sbelectronics/ctostool/tree/master/other/flop144
The second step is to convince the gotek to pretend that your 1.44MB image is a really big 5.25 image. Using software called hxcfloppyemulator, I was able to take the raw CTOS images and convert them to an HFE file that claimed to be 180 tracks / 16 sectors / 2 heads / 256 bytes per sector. It’s important to manually set these parameters when reading the raw image into hxcfloppyemulator. Then export it as an HFE file, stick it on a USB stick, and put the USB stick into the gotek.
Why 16 sectors? why not 8 sectors? That’s a particular bit of weirdness. All of the “real” CTOS images I found were 16 sectors at 256 bytes per sector. Even though the VHB on the disk claimed it was 8 sector / 512 byte. I can’t explain why, other than perhaps that the floppy drives used in the NGEN workstations must be 16 sector drives.
Next question is, why not try to use 18 sector 80 track, the native format of a 3.5″ 1.44MB floppy instead? Well that just didn’t work on the old CTOS version I was running and on my hardware. In particular, any attempt to change the sector count in the DCB to something other than 8, it just changed it back. [Note: You can read 1.44MB floppies natively using the CTOS-III virtualbox on bitsavers, and you can probably read them on a PC-class machine using CTOS III]
Why does this work at all if we’re taking a raw disk image that was 80/18/2/512 and serving it up as 180/16/2/256 ? Well, most of the structures in the CTOS floppy disk format use logical block addressing. So it just doesn’t matter what the actual geometry is.
or does it matter? Reading these 1.44MB images as I’ve done above happens really really slowly. I think the computer is confused about the tracks beyond number 77. It’ll read them, but it seems to do a lot of full drive seeks back and forth.
Patching sysimage.sys to read 1.44MB disks
As an alternative to the above method of either using the tool I wrote, or using the debugger to change the DCBs in memory, you could also edit them right inside the sysimage.sys file. Just search for the byte sequence “02 08 00 01 00 4D” and you ought to find a set of four DCBs for f0 through f4. Change the 4D to the value you wish.
Note that this technique will work for the protected mode images, whereas my flop144 program only works for real mode.
Note that sysimage.sys must pass an 8-bit checksum, so if you change one of these values, you’ll also have to change some other value in order to compensate. I changed the first 4D to B4, the second 4D to 1A. and the third 4D to 19, and that yielded the same checksum. I’m sure there’s a spot in the file where you could simply update the checksum rather than having to mangle other bytes, but I don’t have documentation for the file format handy. Mangling a random copyright notice might also be an acceptable place to fixup the checksum.
Reading CTOS images on the PC
Based on the CTOS Disk Structures linked earlier, I created a program that will allow you to do some read-only operations on CTOS format raw images. For example, you can list the directory structure, or you can extract a file. There’s currently no way to write using this tool, yet.
You can find it at https://github.com/sbelectronics/ctostool
Note that there are a few CTOS images floating around that are actually in MSDOS format. For example, the Games-1 and Games-2 images on bitsavers. CTOS III will actually read MSDOS, but earlier CTOS may not. The tool I wrote only works with images in the native CTOS format. Also note that it expects a raw image file, not an IMD or HFE or other file (hxcfloppyemulator or disk-analyse can create a raw image for you from an IMD or HFE).
Converting IMD or IMG files to HFE for hosting on the Gotek
I use a program called disk-analyse, available at https://github.com/keirf/Disk-Utilities . Many of the Bitsavers images are in IMD format. Disk-analyse can easily convert that to HFE, which is readily serveable by the Gotek.
For IMG, I did not have success with disk-analyse, and instead I use hxcfloppyemulator. It will allow you to read a raw image, specify the format (sectors, heads, tracks, sectorsize), and then you can export an HFE, which is readily serveable by the Gotek.
Installing software
The CTOS versions mentioned in this document span a decade, so there are many different installation schemes for applications and utilities.
- Install.sub. These seem to be the oldest software. A submit file is basically a fancy keyboard replay, with some features to allow the user to occasionally type things. Run these with “software installation”. Alternatively you could use the “submit” command and simply invoke the .sub file.
- HDInstall.sub. These are a little bit newer, but basically the same idea as Install.Sub. You can run them with the “Install” command, or maybe invoke them directly with “Submit”. The install command will also call “InstallRequests” that might be a necessary step to install the requests file.
- Install.jcl. This are written in job control language. One of the online manuals describes how to run the jcl file manually, but I have never tried to do so. In my experience these always seem to be bundled with install.ctrl.
- Install.ctrl. This is the latest and greatest, using the “Installation Manager” that comes with standard software 12.0 or above. Installation manager is a fancy modern installation tool. There might be more than one version of the installation manager, for example I found some applications that I think might only work with the 12.3 installation manager.
Often it’s important to make sure your disks have the volumes named correctly. CTOS allows you to refer to a device by its device name or by its volume name. Many of the tools will install themselves using the volume name, for example an install.sub file might try to copy files from “[B25TCP-1/3]<ctos>somefilename.ext”. If your volume name is set incorrect then the command will fail. Usually this will lead to an obvious error message — use “Change Volume Name” to fix it.
Your vintage QIC drive’s roller has turned into black goo.
Ugh! This happened to me. I had a nice Convergent QIC drive, popped a fresh tape into it, but it wouldn’t spin. Turns out the rubber roller was actually flattened on one side when it tried to drive the tape. The roller had turned into a black tar-like goo. This is apparently quite common with old QIC tape drives. There are some potential fixes:
- http://www.terrysrubberrollers.com/ Terry says he can fix em for a fee. I haven’t done this, but the mightyframe guy has, with good success.
- I tried 3D printing a replacement roller out of TPU. Not sure if that’ll work yet, as it turns out all my tapes were shot.
- There’s videos online from a guy who coated a capstan with plasti-dip to rubberize it. This seems like a good idea, and I could try it on my TPU roller if it isn’t rubbery enough on its own.
- There are some pinch rollers on ebay that look about the right size (0.5″ OD, 0.25″ ID) for cassette players. I’m tempted to see if I could slip one on. In the listings, these are often called “tires”. I don’t know why — maybe an automated language translation issue.
- I read a few threads about people using automotive hose of just the right size to substitute for a roller. I’m skeptical.
Your QIC tapes all have broken drive belts.
No sooner did I fix my black goo roller than this happened to me. I had bought a couple NOS sealed tapes on eBay, and both of them have broken drive belts. The QIC tape cartridge is a fascinating bit of engineering, it turns out that in addition to the magnetic tape, there’s also a little plastic/rubber (perhaps TPU) “drive belt” inside the cartridge. This belt works its way around both of the tape rollers and onto the drive wheel in the front. It’s been long enough that many of these belts have either lost their elasticity, or become so brittle that they immediately break. Some options:
- Transplant a belt from a good QIC tape to the bad tape. You can take your QIC cartridge apart, and there are videos on youtube showing the transplant process. It seems simple enough, but you have to have a known-good tape to start with. Maybe all your tapes are bad…
- Use a 6″ plastiband. This was recommended by a user over on the vintage computer federation forum. You can buy the plastibands on amazon, though the 6″ seems hard to find. I have not tried this yet.
- 3D Print one? I’m going to see if I can print one out of TPU. Will it work? I have no idea.
What is the largest MFM hard drive supported.
The WD1010AL disk controller used in the HD-002 and similar HDD/FDD modules has a 10-bit cylinder counter. This limits the number of cylinders to 1024. The Convergent OS will allow you to configure larger numbers of cylinders without generating an error, and will even format and initialize those disks, but writing tracks 1024 or above will simply wrap and overwrite earlier tracks (this was an unpleasant surprise). Up to 8 heads are supported. Attempting to exceed 8 heads will generate errors while formatting.
I’m not sure about the number of supported sectors. The controller does support sector sizes of 128, 256, 512, and 1024. Generally I chose 16 sectors of 512 bytes each as a safe number. I think you could possibly do 17 sectors instead and get a little more space, though I’m not entirely sure.
Parameters of 1024 cylinders / 8 heads / 16 sectors / 512 bytes seem like a likely maximum. This is approximately 64 megabytes. When setting up my emulator, I went a few tracks shy of 1024 just in case there is an off-by-one limit somewhere.
If you’re lucky enough to have a SCSI unit instead of MFM, then much larger drive sizes are supported.
Your 146MB Micropolis 1375 SCSI drive in your HSX140 or 386i will not boot.
I’ve had good luck and bad luck with this. Check a thread on the vintage computer forum for more information. There is a rubber bumper inside the head assembly (which is inside the “sealed” portion of the drive) that will deteriorate over time. This rubber bumper can become sticky, can deteriorate, or can even start to dissolve into black goo.
I was able to cure a “sticky” bumper in my HSX140 by opening the drive and nudging the head assembly. The drive immediately took off, started seeking, and I was able to image it.
The bumper in my 386i was in much worse shape, having not only deteriorated, but also turned into a gooey tar-like substance. I was not able to recover this drive. I eventually found the lower-most head had contacted the spindle and broken off, perhaps doing catastrophic damage.
If you have a Micropolis drive that has been sitting a while, and it has potentially important data on it, then I recommend you attempt to restore it using a SCSI adapter in a Linux PC first. A failure mode of these drives is that they will operate successfully for a few hours, then fail to initialize on the first reboot after they’ve been running a few hours.
Hi there! I have acquired a Unisys 386 cpu and the floppy disk modules, but there is no hard disk module. I see you have a section that says you have the module but not the drive, is there anything you can do with just the floppy and cpu modules?
Supposedly you can run CTOS off of a dual floppy module — for example, you can boot the OS on one drive, and then run applications (and store data) on the other. It gets rather tight though, as the modern distributions of CTOS seem to take up several megabytes of disk space. I would suggest starting by trying to get the diagnostics floppy to run (perhaps using a Gotek in place of one of the physical drives, or use a kyroflux to write the floppy image to a real floppy). If you had another convergent computer that did have a hard drive then conceivably you could network them. Do you have a monitor and keyboard? Without those, it’s a bit of a battle (see my other post) on adapting hardware from other platforms to serve as keyboard and video.
Do you have a picture of the 386 unit? I’m curious what it looks like… I have the 386 with a built-in SCSI drive and single floppy drive. I’ve been told there was also a standalone 386 unit that didn’t have any drives attached, but I’ve never actually seen that variant myself.
Damn, someone is actually working with CTOS. What an amazingly different world we would be in if this wonderful OS had actually caught on. I was a power user of CTOS in the 1980s, as well as a developer and a regular guest clinician for Progress Software Corporation, who released a version of their flagship database product for CTOS. This was the best operating system ever developed – had it been properly grown, but Unisys killed it off instead.
Incidentally, I have LOTS of CTOS/BTOS hardware and software in storage. Everything from AWS workstations to B39s, and a couple of the SG series Unisys machines (PCs that ran late versions of CTOS and connected via clustercard to the network)
Wow! Sounds like quite a collection. So far my quest to accumulate additional hardware has been pretty limited. It’s a rarity when something shows up on eBay, and occasionally I hear of someone who finds a few Convergent items at a government auction. Mostly I’m afraid these items are probably ending up at recyclers and getting torn down. The software is almost as rare as the hardware. Bitsavers has some, but with occasional holes where I’ll find I can’t complete an installation because some software package is missing. Clustercard is something I’ve been watching out for a while — my gut feeling is the hardware is probably not difficult, and could be relatively easily duplicated, but lack of documentation has been a barrier. I too wish the product line would not have been killed off; It was a unique OS that seemed ahead of its time.
I actually managed to install CTOS on my 486 (generic PC, I have this board since early 90s) sometimes the keyboard stuck when you type , but it works… alas I put that HDD aside (prefer MSDOS + other stuff for that PC) .
As the admin wrote above – most of the h/ware went for recycling, I worked for a EU bank, we had the heck of CTOS installations – I even kept duplicate manuals at home (lost all of them , darn) , but due to major update of the main platform to f windoze 100s of systems went to recycling (due to contract with the local UNISYS).
I’m the guy that placed all those BTOC/CTOS 3.5 inch 1.44 MB floppy images on bitsaver. Sorry guys but I no longer had the 5.25 inch floppy images. I worked for Burroughs/UNISYS in the ’80s and ’90s providing 2nd and 3rd level support for the BTOS/CTOS products, both hardware and software. At one time I had every 5.25 inch floppy disk ever produced for the BTOS/CTOS products. I never thought there would be any interest in the original B20/AWS/IWS hardware when NGEN (PC Hardware) arrived. So while making a residential move I decided to dump the 5.25 inch floppies and only keep the 3.5 inch versions of the software. I have regretted that decision many times since.
I have a set of 5.25″ floppies containing CTOS 11.3, along with the entire set of Standard Software, plus a box of Application Software including:
11.3 Standard Software Initialization (4 diskettes)
11.3 Workstation Utilities (6)
11.4 Workstation Utilities Update (1)
2.3 CTOS VM Pre-built OS Kit (4)
1.0 Image Designer ((2)
2.0 Art Designer (2)
2.2 Document Designer (2)
2.2 Context Manager (1)
2.1 System Performance Accelerator, SPA (1)
2.2 Mouse Services (1)
2.2 Generic Print System (7)
These came with an NGEN 286, color monitor, mouse, keyboard, graphics slice, with a disk module “HD-0A3 AB, which is a 40MB hard disk and 5.25 floppy drive in the same unit.
Unfortunately, the 40MB hard drive is reporting many errors, so I am looking into a replacement utilizing a BeagleBone computer.
The above set of software is being uploaded to bitsavers.org currently. I will post when they are available.
I am planning to do a hard disk and floppy replacement, very similar to what was done in the video.
Hi, I worked for Burroughs in France from 1981 to 1985, including 3 years on the B20 series as a system engineer. For me, it was a revolutionary environment ! 40 years later, now retired, I enjoy relearning how to use CTOS via VirtualBox, thanks to everything that was put on Bitsavers. Thank you to all of you