Okay, so I’ve got a bunch of PCs my “machine room” (i.e. the workshop) and I need a way to turn them on and off remotely. So what I wanted is something that connects to the internet and switches several AC outlets on and off.
Some Pictures:
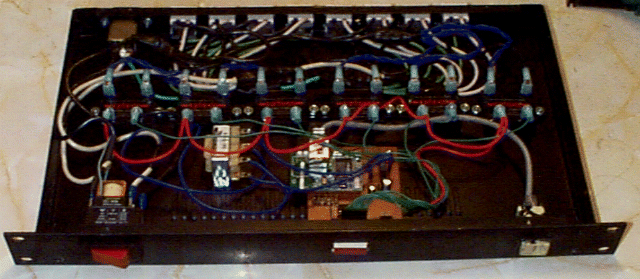
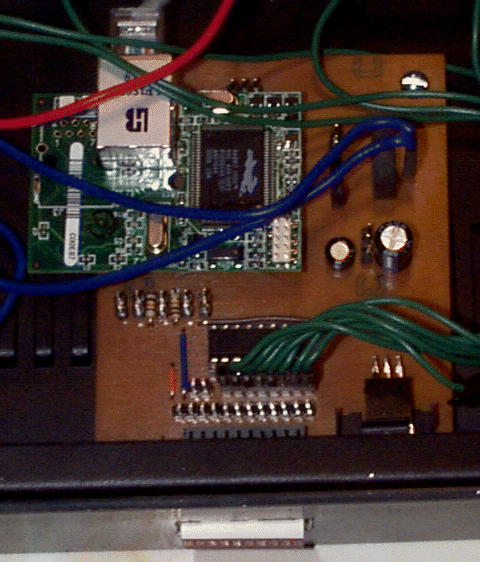
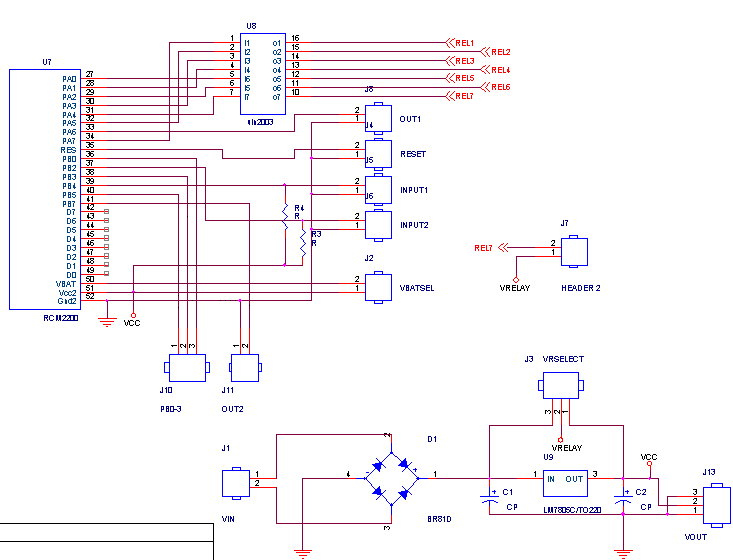
The circuit uses a RCM2200 as for it’s CPU and Ethernet capabilities. The RCM2200 connects to a ULN2003 darlington transistor array.
The darlington array is used to drive high current output devices (such as relays). When a high input is present to a darlington transistor, it pulls the output to ground. When a low input is preset, the output is left (more-or-less) floating. Thus, when we connect an external device, such as a relay, to the darlington array, one wire of the relay goes to a positive voltage source, and the other wire goes to the darlington array.
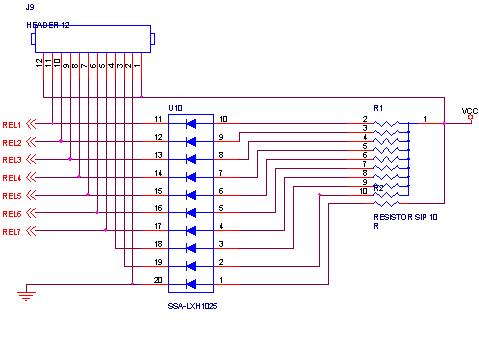
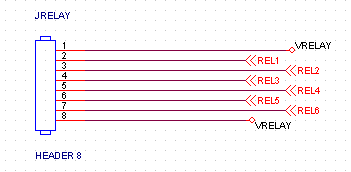
The darlington array connects to a header, JRELAY, which is connected to the relays. The darlington array also is connected to a 10-segment LED array which is used to indicate the output status of each relay (i.e. a LED goes on when the corresponding relay is on).
There’s a three-position jumper, VRSELECT, which selects the relay voltage to be either the regulated 5V, or the input voltage. I did this so I could use either 5V relays or 12V relays and jumper inbetween them.
CPU & Power supply Schematic:
LED Display Schematic:
Relay connector Schematic:
The Relays:
I decided to go with a solid state relay (SSR) instead of the conventional electromechanical relay. I found six SSR’s on ebay for a good price that worked out well in the project. The SSR has no moving parts, and more-or-less can be substituted a traditional relay. The SSR’s that I chose work with an input voltage of 3-28V and have an output rating of 25A at 125VAC.
One important note about SSR’s is that there is usually some leakage — a small amount of current passes through the output side of the SSR even when the input side is off. If you aren’t aware of this, it’ll confuse the heck out of you as to why the SSR’s appear to be “on” even when you’re sure they are “off”.
Fuses/Circuit Breakers
Whenever you’re dealing with AC line current, you should properly protect your project with either a fuse or circuit breaker. I found a box of switch breakers on ebay that worked out well. This particular switch breaker looks and works a lot like a rocker switch, but is also a circuit breaker.
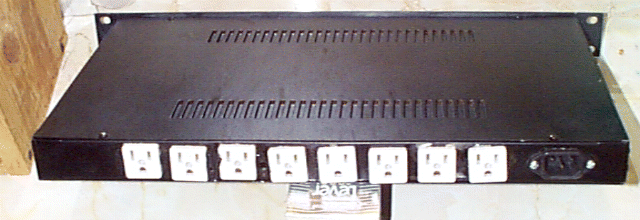
AC Inlet and Outlets:
I used some square AC outlets for the power recepticals on the back of the case. These outlets require an approximate 1″ square opening each. This is very difficult to attempt without the proper tools. I tried to use my dremel and only managed to to mangle up a couple of outlet holes. Fortunately, I was able to gain access to a milling machine, which made very short work of cutting the square holes.
For an AC inlet, I used the type of connector you usually find on the back of a PC. It’s a recessed three-prong male plug and the bonus is that any old PC power cord will work with it. I found a quantity of them at ebay at a discount. You can easilly find this sort of plug at Jameco or Digikey.
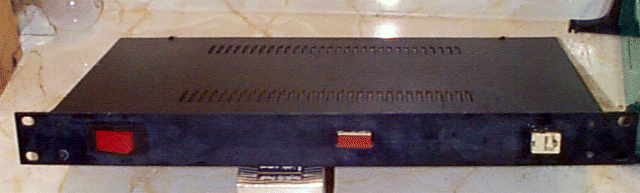
The case:
I used a 1U rackmount project case from Jameco. The 1U case makes it easy to mount the project in my rackmount cabinet. However, a 1U case is a real pain to fit components into. I had to squeeze a lot of stuff in tight. To do it over again, I would have probably picked a 2U case instead.