Mazda RX-7 Sandrail Conversion Step-By-Step Guide
by Scott M. Baker
- Copyright (c) 2003-2004 Scott M. Baker.
Note: Please do not plagiarize this page! You are welcome to place a link to this page from your site, but please do not copy the contents (or pictures) from this site to your website without our express written permission (contact: sandrail@smbaker.com).
Okay, here’s a step-by-step breakdown of how to convert your sandrail over to a mazda rotary engine.
Phase I: Getting the engine mounted to the rail:
Step 1: Remove the old engine (duh!)
Step 2: Acquire a new engine and the adapter kit. It’s recommended that you get an engine out of an automatic, since you’ll need the automatic’s counterweight assembly. Note: I also recommend getting a heavy-duty “throwout bearing cross arm” if you’re installing a heavy-duty pressure plate.
Step 3: Install bronze pilot bearing (if your motor was originally an automatic). The little bronze pilot bearing goes inside the end of the crankshaft. Before pushing (or pounding?) it in, double check that the inside of the bearing is appropriately sized to the diameter of your transaxle’s shaft.
Step 4: Install the modified VW flywheel on the motor. There are 8 bolts that attach the flywheel to the counterweight assembly. I torqued these each to 45 ft-lbs.
Step 5: Install clutch disc and pressure plate to flywheel. You’ll need to acquire a clutch alignment tool (I found one at a local parts store for $2.50). The alignment tool is used to make sure that the disc is properly centered on the crankshaft. An alternative to the alignment tool is to use the input shaft out of an old VW transaxle if you have such a thing laying around. The pressure plate – to – flywheel bolts are torqued to 22-30 ft-lbs.
Step 6: Attach adapter plate to engine. There’s about a half dozen bolts for this. Some of them go in through the front of the adapter and some thread in from the back.
Below is a picture of the motor with the flywheel, clutch kit, and adapter plate installed.
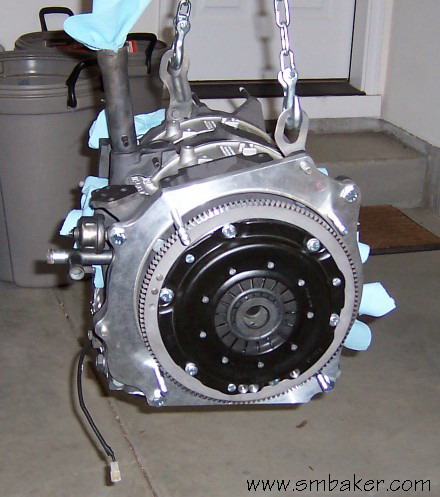
Step 7: Attach motor to sandrail. I suspended my engine from the ceiling with a come-along (note the chains at the lift-points in the above picture) and rolled the sandrail into place. An inexpensive chain hoist (such as the 1-ton hoist from harbour freight for about $50) works much better than a come-along. The engine slid in fairly easily — I had to shift the rail into gear and give it a little rocking to get the splines in the clutch disc to line up with the transaxle shaft, but it wasn’t too difficult. Once this is done, four nuts secure everything together. The instructions say not to torque the nuts to more than 40 ft-lbs, but I found no way to get a torque-wrench anywhere near them, so I torqued them to the standard “feels-about-right” amount.
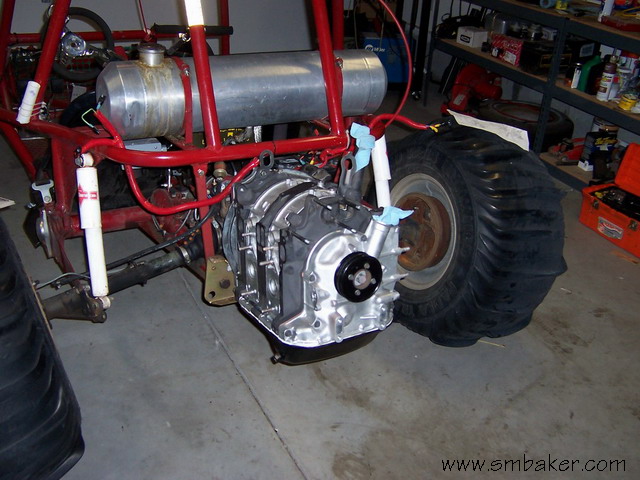
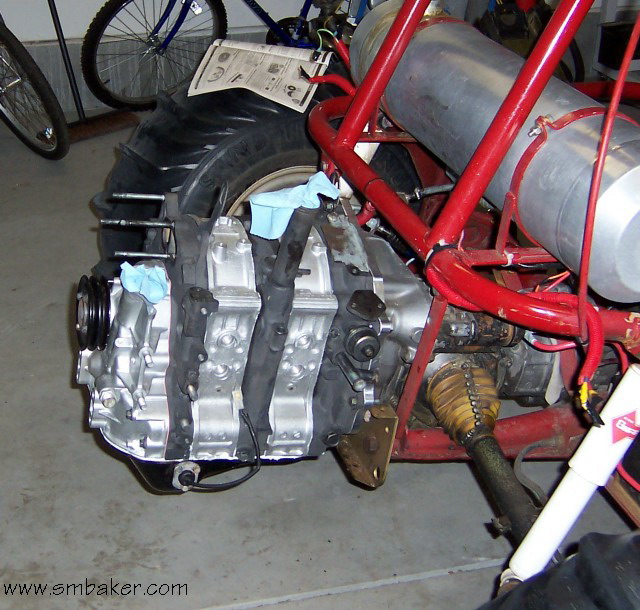
Okay, phase I complete. It took me about 2 hours to do the above. Someone more experienced could probably get it done in about 30 minutes. Here are some pictures of the sandrail with the engine bolted to it:
Phase 2: Adding accessories to the motor
The motor needs lots of things to run (distributor, intake, carb, exhaust, to name few….) so here’s a breakdown of everything.
Oil Filter: My first 12A motor was a newer style with the combination oil filter / oil-cooler. The problem is, the unit was too big and interfered with the frame tubing of the rail. It is possible to convert the newer oil filter/cooler to the older style. Just pick up the older style filter mount from a junkyard and install it in place of the newer one. You’ll need some adapters for the oil cooler lines and an external oil cooler. Mazdatrix sells adapters that use AN10 fittings. I purchased russell AN10 fittings and hose from Summit Racing, and an external plate-style oil cooler from a VW supply place.
Oil Cooler: Best to use an external oil cooler. Use the AN-style adapters from mazdatrix and some stainless-braided an hose and appropriate fittings. The fittings are very easy to use, and result in a high-strength clean installation. I located my oil cooler near the radiator, but not back-to-back, so the heat from the oil cooler doesn’t combine with the heat from the radiator.
Instrumentation: You’ll want to add aftermarket gauges to the engine. I chose VDO gauges and senders and an adapter plate from Mazdatrix (or Racing Beat). I’ve setup a whole page discussing the instrument panel here.
Distributor: The stock 12A distributor is fine. The one I’m using came off of a 84 or 85 and includes the ignitors built right into the distributor. The very early models (79 or lower?) might have an external ignitor box, so watch out for that.
Radiatior: Adding a radiator to a sandrail is complicated because very few sandrails were originally designed for them, so you’re entirely on your own. You want to air to flow through the radiator in the same direction is ram air if possible (i.e. when you drive the rail, the air blows through the radiator, not against it). I recommend going with a radiator with an electric fan if possible due to the ease and versatility of mounting.
My first shot at a radiator was a used dodge caravan radiator (approx year 1985?) which seems to work fine for a while, but would overheat if you ran it too long. My second shot at the radiator is a custom-built aluminum radiator that cost about $250 for the radiator shop to build for me.
Catch Can: You’ll need an overflow or “catch-can” to catch excess radiator fluid. Letting it run out all over the dunes really isn’t a good idea! There’s two options out there — the non-recirculating type and the recirculating type. Recirculating containers have a tube that runs to the bottom of the container, so when the radiator cools off, it will suck the fluid back in and replenish itself. The non-recirculating type dumps the fluid in at the top of the container, where it fills up, and can be drained from a drain valve on the bottom. I purchased a little plastic non-recirculating racing type catch can from summit racing for under $15 that looks very good and works fairly well (it might even be possible to convert it to recirculating; I haven’t tried yet).
Starter: The kennedy adapter plate uses a standard VW starter. If you call kennedy, you’ll either be told the stock 12V VW starter is fine, or you’ll be told you need to buy a 6V starter and run it at 12V to make the motor spin fast enough (depends on who you talk to there). In my case, I found the stock 12V starter to work fine. This is on a freshly rebuilt engine, with a good strong battery. Whichever way you go, you have to make the choice up front, as the 6V and 12V starters use different flywheels, so you’ll have to make sure you order the right kit from kennedy to match the starter you want to use.
Ignition: The ignition system uses two coils: leading and trailing. I scavenged mine from the junk yard, with the original junk engine that I bought. The modifications page here on the website describes how to wire the system.
- An alternative to the stock ignition is a direct-fire ignition that bypasses the distributor using an MSD-6A ignition module. I just recently installed this system — you can find complete details here. For the direct fire configuration, you remove the LEADING stock ignitor and use the MSD-6A and two blaster coils instead. The MSD-6A connects to the LEADING trigger in the distributor. Both blaster coils connect to the MSD-6A. One coil connects directly to the #1 LEADING plug, and the other connects directly to the #2 LEADING plug. Thus, it fires both #1 and #2 at the same time (one spark will always be “wasted” as one rotor is not in position). You retain the stock TRAILING ignition. Thus it’s a three coil solution (one coil for #1 leading, one coil for #2 leading, and the third (stock) coil remains to handle both trailing plugs).
Intake and Carb: I hate the stock carb. I’ve been through two of them and completely rebuilt both of them. If not properly setup (too much fuel pressure, or bad float adjustment), they will foul the plugs. The stock carb is an ugly beast with all kinds of emissions crap that needs to be torn off of it. It requires a return line to your fuel tank, which is a pain in the butt. Literature and advice are difficult to find. There are lots of reports from racers using them in race cars without problem, but these guys must be more talented (or started with better carbs) than I am.
The stock carb is very sensitive to both the float level and the fuel pressure (visit Paul Yaw’s site at yawpower.com for more details). If the float level is set to high (or if the fuel pressure is too high), the carb will run rich. The carb rebuilding kits contain information on how to set the float levels correctly.
- Also, be very careful of buying used carbs. I purchased a used carb from a place called “Mazda Auto Dismantling” in Rancho Cordova, CA, and unfortunately had to send the carburetor back within an hour of receiving it due to poor condition and unusability. I finally got my money back out of the junkyard (with some forcefulness on the part of my credit card company’s chargeback department) after about 4 months.
If you are looking for quality mazda parts, then I might suggest Mazdatrix and Racing Beat, both of which I’ve dealt with personally, and both of which have excellent customer service. For carburetors in particular, try Paul Yaw at www.yawpower.com — I haven’t had dealings with him personally, but I’ve heard good things about that shop.
Alternatively, you can use either a holley or weber carb and appropriate intake manifold. Racing Beat or Mazdatrix sell weber and holley kits. That’s the system that I recently installed — details are here.
Fuel Tank: If you use the stock carb, then you’ll need to plumb a fuel return line into your tank. As an alternative, you can get by with putting a “T” fitting below your tank, with one line going to the pump, and the other line coming from the return — that’s what I did, and it seems to work reasonable well. There is some aeration of the fuel if you let the tank run empty and you first turn on the pump (air bubbles pumped out the return getting sucked back into the intake), but it settles down fairly quickly.
If you go with the modified holley carb instead, then you don’t have to worry about the return line, as the holley doesn’t require one.
Fuel Pump: It is recommended that you scavenge one off of an RX7. However, I didn’t get one, so I had to buy an aftermarket. I have heard reports of flooding problems related to aftermarket pumps, so I also purchased a fuel pressure regulator. Some literature claims high fuel pressure could result in a fire hazard, so you want the fuel pressure to be somewhere around 5 psi. Also make sure to get a fuel filter and plumb it inline as well.
If you use the holley carb mentioned above, then you’ll need a slightly more capable fuel pump. I ended up going with a holley “Red Pump”, for just under a hundred bucks from Summit.
Alternator: The stock alternator is fine. It has a built in regulator. There is one screw terminal which goes to your battery, and a two-terminal plug. One wire in the two-terminal plug connects to the ignition, and the other is for an idiot light (If I remember sometime, I’ll post a wiring diagram…). You’ll need to pick up a fan belt to run the water pump and alternator. What I did was to take a piece of wire and stretch it around the pulleys to see how long the belt needed to be, and then took it to an auto-parts store. Have them add an inch or two to the length, as the wire squeezes into the pulleys further than the belt will.
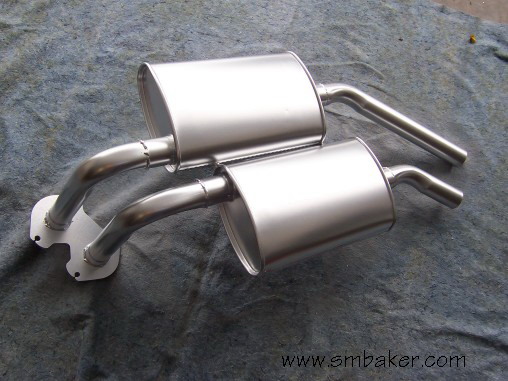
Exhaust: You’ll need to come up with a custom exhaust system. The existing exhaust manifold will interfere with the transaxel mount, so you can’t use that. You might be thinking you could just flip the exhaust manifold over and get the exhaust going the right way, but flipped over, it will interfere with the water pump. So just throw the damn thing away…
I had midas build me a custom exhaust system. I used a header flange (flat plate with the exhaust hole and bolt pattern on it) from mazdatrix and had midas weld the exhaust system to that. We have noise restrictions here in Oregon, so I had them add a couple of mufflers. Even with the mufflers it’s still very loud. Paint it with some high-temp (1200 degree) paint. Even with the mufflers, the engine is still good and loud.
Shocks: In my case, I was upgrading from a stock VW engine, and I found that the additional weight of the rotary engine and it’s accessories threw the suspension out of whack and cuased it to bottom out. Adding a pair of inexpensive coil-over shocks solved the problem.
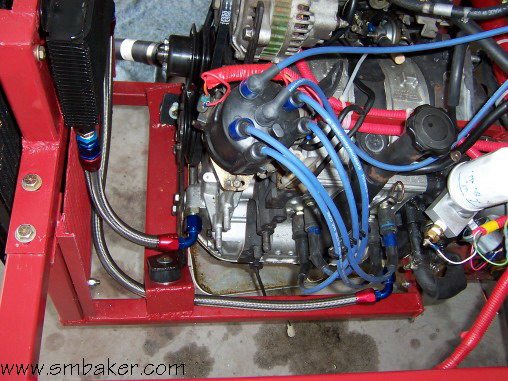
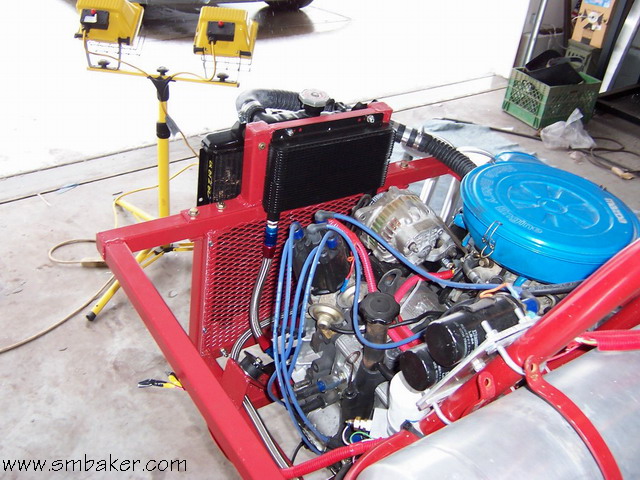
Conversion Pictures: Here is a picture of my original conversion, minus the exhaust system. At this stage, the sandrail had the original stock carb, original ignition, and the smaller dodge-caravan radiator.
drivers side:
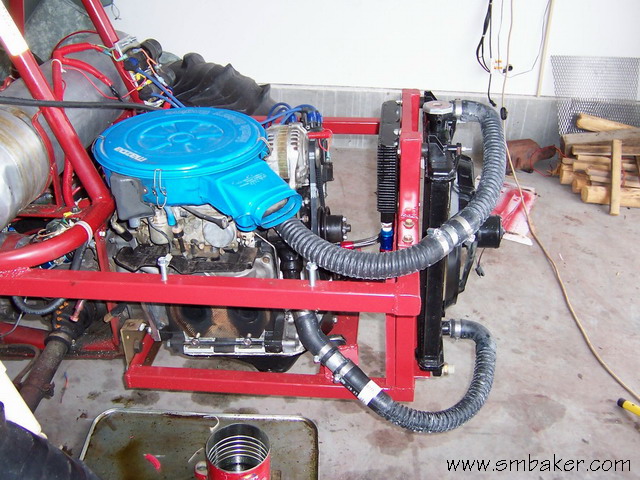
passengers side:
Questions / Comments / Etc — email me at sandrail@smbaker.com
Looks great I’m trying to do 68 bug conversion and found this very helpful located in Springfield or hope to see you around